|
|
||
|
|
|
|
|
|
||
Batteries and Charging
|
|
|
|
|
|
Copyright © 2002-2013 John Mayer. All rights reserved. For reuse policy see Reuse Policy
Volumes can be written on batteries. If you want to understand exactly how they work and are constructed there are plenty of resources available on the web. One of the best sources for general battery info is Battery FAQ's This section looks at batteries from a practical view, as used in an RV. The best explanation of how to properly wire multiple batteries is http://www.smartgauge.co.uk/batt_con.html (I exposed this link since it may change; you might find it easier if you can see the text).
One thing about batteries and RVers - everyone has an opinion. It is a favorite topic of "techies". I've tried not to go into too much technical detail - use the references for a more complete battery "experience". Believe me, if you dig into the two sources above and digest the information you will know far more about batteries and charging than almost anyone you will meet - probably including me.
Deep cycle batteries used in RV systems are all lead-acid type. Ni-Cad and NiFe (Nickel-Iron) batteries are sometimes used in industrial applications but are not well suited for RV use. There are basically four types of lead-acid battery construction; flooded (wet) cell, sealed flooded (maintenance free), gel, and AGM (absorbed glass mat). Flooded batteries are your normal batteries used in cars, and in most RV’s. They can be deep cycle, or “starting” type, and can be “sealed” or have caps on them so that water can be replaced. All gelled and AGM batteries are sealed.
All the batteries used in RV “house” applications should be deep cycle batteries. NOT marine or starting batteries. SLI, or starting batteries, are designed to supply high starting current for brief periods of time. With many relatively thin plates, they are designed for many shallow cycles, and to maximize the current available for a brief starting cycle. In a starting application they are discharged less than 10%, and can last for thousands of cycles. If deeply cycled, they will last as little a 30-50 cycles.
“Marine” batteries have slightly thicker plates and perform a little better than starting batteries, but they are usually not considered deep cycle batteries. Both SLI batteries and Marine batteries are usually rated in CCA (cold cranking amps). There is no quantitative measurement to define what a "deep cycle" or "true deep cycle" battery is. Thus it is very difficult to choose between batteries of similar type. In general, "deep cycle" batteries are designed to be cycled at 50% or more for many repetitions. They are differentiated from the starting and marine batteries by the thickness and construction of their plates. This is what enables the many deep cycles. Deep cycle batteries have solid lead plates and are quite heavy. “Golf Cart” batteries are not generally deep cycle batteries like L-16 or industrial batteries, but are somewhere in between a starting battery and the industrial traction batteries. A real "golf cart" battery is designed specifically to power a golf cart and is optimized for that discharge/charge cycle profile. But, from a practical perspective they are considered deep cycle. It is hard to make a judgment about what battery is "better" in an alternative energy application when you are restricting yourself to golf-cart-size batteries, or batteries slightly bigger. You can look at warrantee and you can look at the weight of the battery. Both can give you some indications, but neither are definitive. I generally balance price with "anecdotal" use experience. We know that a Trojan T-105 "golf cart" battery performs well, and lasts generally 5 years or so. We also know that most of the Sams Club "golf cart" batteries last about as long, and cost less. So does that make them as good? Only you can decide.
Golf cart batteries last 2-5 years in RV use, gelled cell batteries last 2-5, and AGM’s last 4-7 years. This is typical use; it can be less or more, depending on treatment and how often they are cycled. Industrial deep cycle batteries can last far longer, but are difficult to use in RV’s, because of space and weight considerations. For example, an L-16 battery easily lasts 4-8 years, and large forklift batteries can last even longer. Large single cells used by the telephone companies for backup power can last for over 20 years in that application (because they are usually not cycled often or deeply). Many (but not all) manufactures publish tables of the number of cycles you can expect at different DOD (depth of discharge) for their batteries. We know people who have gotten over 5 years from Sam’s Club golf cart batteries. They treat their batteries well (no deep discharges, proper watering, and regular equalization), and they are lucky. We got over five years on our bank of four Sam’s Club 6-volt golf cart batteries and they were still performing within specifications. But we know we were on the downside of their lifespan. I know people that have gotten 10+ years from T-105's. But they are well treated.
When comparing batteries in places like Wal-Mart or Sam’s Club ONE of the factors in determining the "better" battery is its weight. Assuming that they are the same “group” then the heavier battery will often be better (in use), because it has heavier plates. Compare a Trojan T-105, T-125 and a T-145. The T-105 and T-125 are identical in "footprint" size (they fit in standard Group 27 battery boxes). The T-105 weighs 62 pounds and is rated at 225 amp hours, compared to 66 pounds and 235 amp hours for the T-125. The T-145 has the same footprint but is 5/16 higher. It weighs 72 pounds and is rated at 244 amp hours. Of course, there is a price difference among them. The best deal I have ever seen on new T-105’s is $55, in 2003. In January 2005, you could buy the same “class” golf cart batteries at Sam’s Club for $48 each (220 amp hour rating, generally made by Excide or Trojan). In 2007 the Sam's Club golf cart batteries were around $62. If you have the space and can carry the weight, the Trojan L-16H weighs 121 pounds, is rated at 395 amp hours, and measures 11 5/8 x 7 x 16 11/16 high. Don’t ask me to help you put these in, though - I'll watch and give "moral support". Sometimes you can find “deals” on flooded–cell batteries that have never been put into service (e.g. they are “dry”). Be careful with this. Even though batteries are shipped dry, and stored dry, they still have a little moisture in them. They do deteriorate in this state, so check the date of manufacture on the battery. Don’t pay full price for a flooded-cell battery that is over 18-20 months old, even if it is “dry”. You will not get full life out of such a battery, but it may be worth the price charged. We once bought T-105’s that had been dry stored in a battery warehouse for 2 years. They tried to sell them at full price, until we pointed out their manufacture date. We got four of them for $115 with no tax (total price, not each), so it was worth the risk. They did charge to specifications and load tested to spec. They lasted 3 years, but that is a reduced lifespan. Here is the bottom line on batteries, from my perspective. There is no compelling evidence that 6-volt is better than 12-volt in this application. A heavy battery is going to be better than a lighter one, but other than that look at price and antidotal use. How you charge and use the bank makes more difference than which set of batteries you have, assuming you buy decent ones to start with. For smaller banks (under 400 Ah) I personally like the Sam's Club 6-volt batteries because of cost/lifetime tradeoffs. But there are good 12-volt batteries out there as well. On our personal coaches we now use only AGM batteries. I find them to be well worth the additional expense, and they do take a charge from the genset faster, if that is a consideration. We have used Lifeline AGMs (the 8D 12-volt versions) on our 2012 New Horizons. On our 2015 New Horizons we are using Fullriver L16 AGM batteries. These are Chinese batteries that have a good reputation in the off-grid world. We know several people that have used them with good results. They are considerably cheaper than the comparable Lifeline battery. We have six of them for a total of 1200 amphours of storage.
Lithium Batteries
In recent years lithium batteries - specifically LiFePO4 - are starting
to be more widely used in RV's. The abbreviation stands for Lithium Iron
Phosphate, and is also called LFP. These batteries are far different
than the lithium batteries that you hear about catching fire so easily.
But they still need to be handled appropriately, and used with specific
management equipment. There are now pre-packaged kits that contain
everything you need to install a LFP battery bank - this is different
from just a few years ago where you basically had to pull all this
together yourself.
LFP batteries have many advantages, but they do
have a "breathtaking" initial cost. Among the advantages are: Very fast recharge times Very good safety characteristics relative to
other Lithium types. LFP has very good thermal and chemical
stability. You can draw them down very far without harm
- 70% or more discharge is typical. In fact they have a pretty flat
energy curve during discharge, maintaining a 3.2 voltage (per cell)
until near empty. This characteristic is completely different than
other battery types and makes them very attractive. They are relatively light. That, in
combination with the depth of discharge, means your overall battery
bank weight can be much lighter than a flooded cell
bank for the same stored power. There overall lifetime cost (per discharge)
is either near or better than a flooded cell bank. They simply last
far longer, although they cost more initially. If you are going to
keep your RV then they may cost the same or less than a flooded cell
bank. Or if you would move them between RVs. No outgassing, so like an AGM you can put
them anywhere. I'll discuss LFP batteries more in the future.
Your battery bank is going to be charged by multiple charging sources, depending on your setup. Your tow vehicle or motorhome engine will charge your batteries when you are moving. As discussed elsewhere, this is not going to provide a very good charge unless you set up a sophisticated engine charging system, but it will top them off if the bank is not at a high state of discharge. If you install solar panels then the solar controller provides the primary charging source for your battery bank. This provides the best charge, since it is multi-stage and slow. Most solar controllers also have an inbuilt mild equalization effect by design. Your inverter/charger has a high power battery charger built into it which is great for a quick charge of a depleted battery bank. This is the fastest way to get your bank restored when boondocking. Lastly, if you leave your converter wired into the system, then under certain circumstances you can also use your converter as a charging source.
Batteries can only “take in” so much amperage during charging without being damaged. Flooded cell batteries are usually charged at no greater than C/3, where C is the 20-hour rating for the bank. Thus a 440 Ah bank can be charged at greater than 100 amps (usually the inverter max). Gel batteries must be charged much slower, at C/5. AGM batteries can accept much higher currents during charging, so are fully charged much faster (an advantage when boondocking and using a genset or solar to charge). Lifeline AGMs can be charged at almost any rate you can push at them (up to Cx4). Optima batteries are typically charged at Cx2. This is a significant advantage to AGM’s as compared to flooded cell batteries.
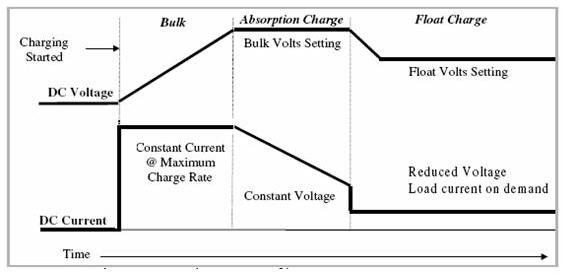
Both the inverter/charger and the solar controller contain battery chargers that should be using a Pulse Width Modulation (PWM) charging algorithm. This breaks the charging cycle into three phases (some manufacturers say 4 or 5, but these are just variants of the 3 stage PWM cycle). Do not buy a charger that does not use some variant of PWM. Your inverter and solar controller manuals will cover these in detail. I’ll summarize them here. The three charging stages are Bulk, Absorption, and Float. There are some inverter/chargers that allow you to turn off the float charge (an example is the Xantrex RS, but that is an option).
Stage one of the charging cycle is bulk charging. During bulk charging the batteries are charged at a constant current. The current is determined by the maximum charge rate set by (in) the inverter and is based on the size of the battery bank, and type of battery. You specify this when you "program" the inverter during installation. Voltage rises during this phase until it reaches the bulk charge voltage set for the battery type. For flooded cell batteries this is typically (incorrectly) set at 14.4 volts by default, for gel cell types it is 14.1 volts. If temperature compensation is being used, this will vary based on the battery temperature detected. The batteries will start to gas when the bulk voltage is reached. Bulk charging restores about 75% of capacity.
Once bulk voltage is reached the charger enters the Absorption Stage. During absorption the current is gradually decreased at whatever rate maintains the bulk voltage setting (just below the gassing voltage). If voltage starts dropping then current is increased again until voltage remains constant. The absorption stage ends when the current required to hold the voltage at the bulk setting declines to the setting programmed into the inverter. This is often C/40, where C is the total Ah rating of the bank (so for a 440 Ah bank it is about 11 amps), but it can vary based on the manufacturer, and the source of charge (solar controller or inverter). If the current never declines to this point, then a timer will terminate the absorption stage, usually after 12 hours. Most battery experts will tell you that a level of 1 – 1.5 A per 100 Ah of battery rating indicates a full charge. Notice this is different than some inverter manufacturers. If your inverter allows selection of acceptance voltage algorithms, go with one that is consistent with your battery manufacturer’s recommendation. If you don’t have that information available, then use the inverter default for the battery bank size and type. Absorption charging restores the remaining 25% of the batteries capacity. Once you have your monitoring system in place, you can watch this process happen. It won’t take you long to get used to how your batteries are operating.
Note: almost all in-built battery charge algorithms for flooded cell batteries specify 14.4 volts as the bulk set point. For most flooded cell batteries that is not enough to fully charge them. I always set the bulk charge for 14.8 volts, as recommended by Trojan, and others. Always use your battery manufacturer recommendation, but if you do not have one, I would use 14.8 volts.
The Float Stage starts at the termination of the absorption stage. Typically, the batteries are fully charged at this point. The purpose of the float stage is to maintain this full state of charge without causing battery gassing. The voltage is held at a constant 13.5 volts for flooded cell batteries, and 13.4 volts for gel types. Current is held at a low level, to maintain the voltage required. Higher current is available on demand to supply DC loads, but voltage is held at the float set point which is dependant on battery type. Some experts do not believe in a float stage, but most chargers force you into this stage. Some chargers allow you to set up a 2 stage charging algorithm that does not include a float stage. Other chargers, like the Outback, use multiple float stages, separated by a “quiet” time where the charger is not operating. We avoid an application of a constant float stage by only using our solar controller for charging (normally, our battery charger is always "off" - we only turn it on when solar is not recharging our bank fully). This way, float only lasts during the daytime, and only when there is sufficient sunlight to support it.
Most inverter/chargers have an equalization mode (as do many solar controllers). The purpose of equalization is to remove sulfates from the battery plates, and to break up stratification of the acid and water in the battery case, both of which occur over time in normal use. If successful, equalization results in all the cells specific gravity equalizing to a single value, thus the name. Usually, this is manually started on an inverter. On a solar controller you can set up an automatic equalization cycle, or there may be a built-in mild equalization charge placed on the batteries at the start (in the morning) of each charge cycle. Only flooded cell batteries should be equalized. Placing an equalization charge on gel or AGM batteries can harm them. Inverters and solar controllers have settings to prevent this from occurring. During equalization, up to 17 volts is placed on the batteries. This can damage sensitive electronics in the RV (such as refrigerator boards) so the batteries should be disconnected from the RV loads. For equalization to be effective at least 3 amps of current per 100 Ah of battery bank capacity must be available.
There is additional discussion of charging in the the Inverter/Converter section.
Choosing the
From a practical perspective you have a choice of Wet-cell, gel, or AGM batteries. Wet-cell (golf cart and other types with removable caps) have a price advantage over gels and AGM batteries. They have the disadvantage of requiring regular maintenance, and proper venting of the fumes released by the gassing that occurs during charging. They can not be placed on their sides, since they are not sealed, and can not be placed in living spaces. Gel and AGM batteries are much more flexible in this regard – they can be placed on their sides, and anywhere in the RV, since they do not gas. They can also be placed in the same enclosure with the inverter. Battery gas is explosive, so wet cell batteries should never be placed in the same enclosure with the inverter (which can “spark” under the right circumstances). There is one really good reason not to use gels and AGM’s – price. They cost 3-4 times as much as flooded cell batteries.
Since AGM batteries have become available, use of gel batteries is probably not a good idea and they are no longer commonly seen in RVs. Gel batteries have to be charged at a much slower rate (C/5) to prevent gassing, they also need a lower voltage during charge. They can also lose water due to evaporation in hot climates (or enclosures). This shortens their life, since there is no provision to replace this water.
AGM batteries have a glass mat that absorbs the acid/water mixture placed between their plates. Even if the case is punctured, they will not leak. They do not loose water, since it is automatically recombined with the acid during the charging cycle. Because of the construction, they are very resistant to vibration and impact (the glass mats cushion the plates), they can accept a full charge, just like wet-cell batteries. In fact, the internal resistance of AGM batteries is so low that they charge faster than other battery types.
AGM batteries are ideally suited for RV use. They are far superior to flooded cell batteries, like golf cart batteries; they take charge at a much higher rate (ideal for solar and genset recharging), they survive shock and vibration better, no maintenance is required, they are sealed so you can put them anywhere (even on their sides, or inside your RV). But, and this is a big but, they are expensive.
If you have never maintained a large house bank before, I highly recommend using the relatively inexpensive Sam’s Club golf cart batteries. They perform well for the money, and if you mess up you can replace them easily. Once you are used to battery maintenance and your energy needs are better known you can invest in higher performance batteries if you want. I’ve found that the Sam’s batteries last as long as the Trojans and perform almost as well. In use I see no significant difference.
Concorde is the manufacturer of AGM batteries you see the most (they also make the Lifeline batteries).
Battery Bank Sizing and Installation
Once you have estimated your electrical demand you can determine the size of the battery bank required to support your loads. For most RVer’s, a bank of four flooded cell batteries (like Trojan T-105s) will suffice. They will give you approximately 200 Ah of power if drawn down 50%. As discussed, you should try to only draw down 25% of your bank’s usable power. That would mean approximately 100 Ah would be available under normal conditions. If you need to draw them down further, then you can go to 50% DOD without concern.
If your electrical demands are consistently 175 Ah or more, then you should consider expanding your bank size to six batteries. This will allow you the power you need without taxing your battery bank, and will prolong the life of your batteries. If you are using a residential refrigerator you have an additional house load you have to figure into your battery storage considerations. Most residential refrigerators use in the neighborhood of 100 DC amp hours per 24 hours. You need to account for this in battery bank sizing. Also consider how you will restore this if boondocking and depending on solar during cloudy or rainy days. I recommend a minimum battery bank size of 600 amp hours if you have a residential refrigerator, unless you plan to do no boondocking.
Another sizing consideration you need to consider during the design stage is balancing the battery capacity with the solar charging capacity. If your goal is to be able to recharge your bank from solar then you have to balance the solar and battery sizes. A general rule-of-thumb for recharging is around one watt of solar for one amphour of battery capacity. So four T-105 class batteries (400 Ah, rounded) are optimally charged by a minimum of 400 watts of solar panels. Don't get obsessed with this - it is strictly a rule-of-thumb. In any case, you need to have a battery bank sized properly for your electrical demands. You can always add solar panels later, or use a generator to make up charge. In my opinion - and others disagree with this - it is better to have more panels than needed for charging your battery bank. This gets you charged earlier in the day, makes excess panel energy available to use during the day without affecting the battery bank, and most importantly, it means that on a cloudy day you will still attain a full charge. The cost per watt of solar is relatively low these days.
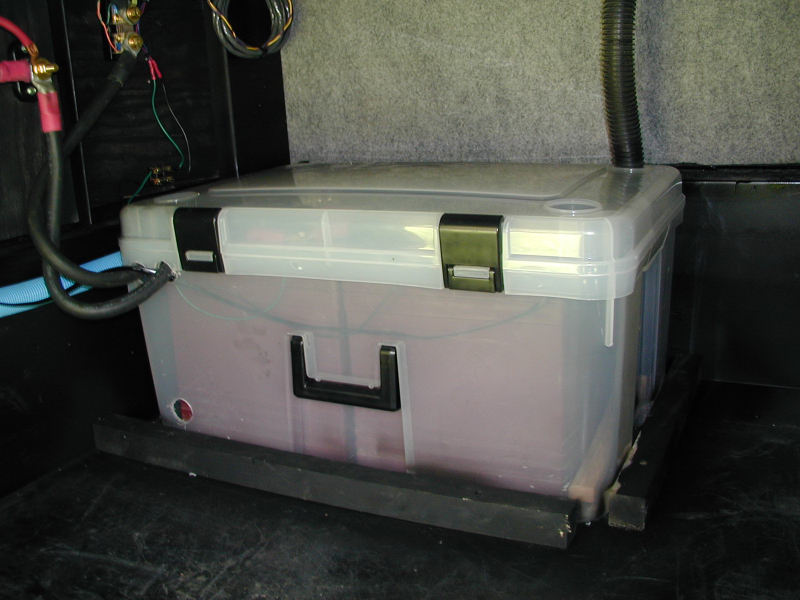
The biggest issue with batteries is usually finding room for the size bank you need. Sometimes, it is not possible to install the ideal bank size because of space constraints. This means more generator run time, or reducing your electrical demand through conservation. Most 5th wheels have space for at least two batteries in the space the manufacturer supplied. Sometimes there is space for four, but rarely for six. Motorhomes sometimes have additional space available in the battery compartment, but can be more difficult than 5th wheels to find sufficient space. Batteries need to be located together, and in a vented space separate from the inverter and the solar regulator, both of which can generate sparks and arcs that could ignite battery gas. Sometimes you have to use your imagination to find a suitable location. In a 5th wheel you can move the batteries to the front storage compartment and put the inverter and solar regulator in side compartments, or in the main compartment. The inverter needs to be within 10-12 feet of the battery bank - max. You will also need space for fuses, shunts and other components involved in installation. Plan your location carefully, making sure that you can hook up all the required components.
Battery Wiring
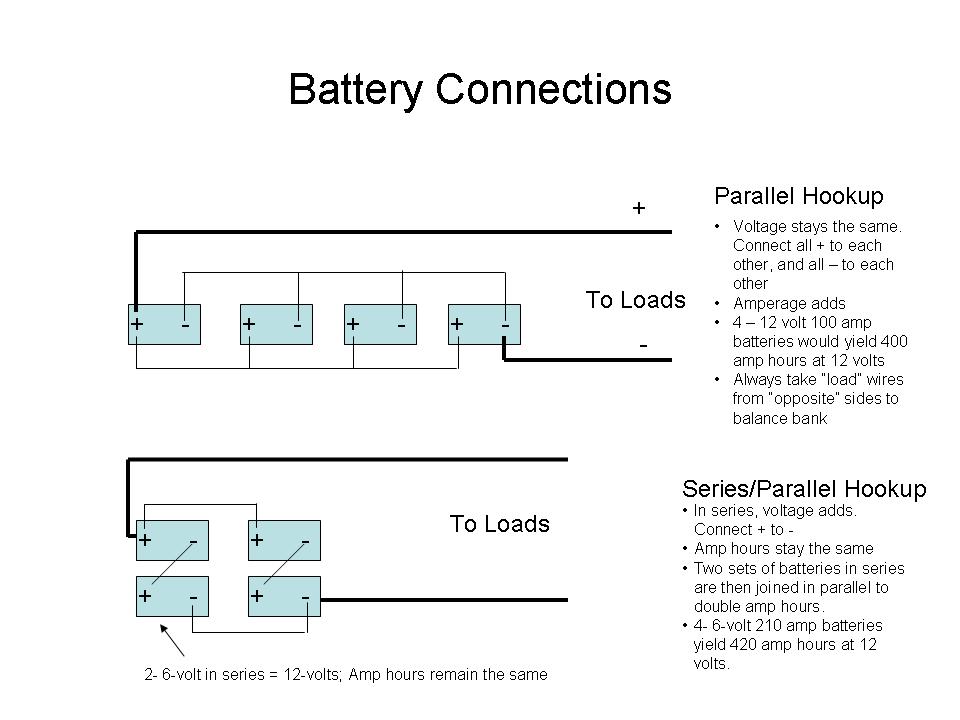 Wiring the battery bank depends on the battery configuration. In a
typical RV installation you need 12 volts to supply the house loads (we
are ignoring busses for this discussion). That means you have to combine
two 6-volt batteries in series to produce 12 volts. Pairs of 6-volt
batteries are then combined in parallel to sum the amperage available,
while maintaining 12 volts. If using 12-volt batteries you simply
combine them in parallel. Wiring the battery bank depends on the battery configuration. In a
typical RV installation you need 12 volts to supply the house loads (we
are ignoring busses for this discussion). That means you have to combine
two 6-volt batteries in series to produce 12 volts. Pairs of 6-volt
batteries are then combined in parallel to sum the amperage available,
while maintaining 12 volts. If using 12-volt batteries you simply
combine them in parallel.The size of wire used to interconnect the batteries depends on the
maximum load to be drawn from them. The inverter will place the heaviest
load on your battery bank. Your inverter manufacturer will tell you what
size wire is required for the inverter, based on its distance from the
bank. They usually specify that the battery interconnect wiring is to be
the same size. If you "overbuild" the inverter feed wiring (by using,
say, 4/0 wire when 2/0 would suffice) you can use the next size
smaller to interconnect the battery bank. The battery interconnects have
to be able to support the maximum load the inverter is capable of.
Personally, I would never use less than 2/0 for interconnecting batteries
when an inverter is involved. The reason is that even if you have a
small inverter now, if you go to a larger inverter you don't want to
have to rewire the battery bank. Information on cable building is in
the Truck Electrical Center section. You will be much better off
building your own cables.
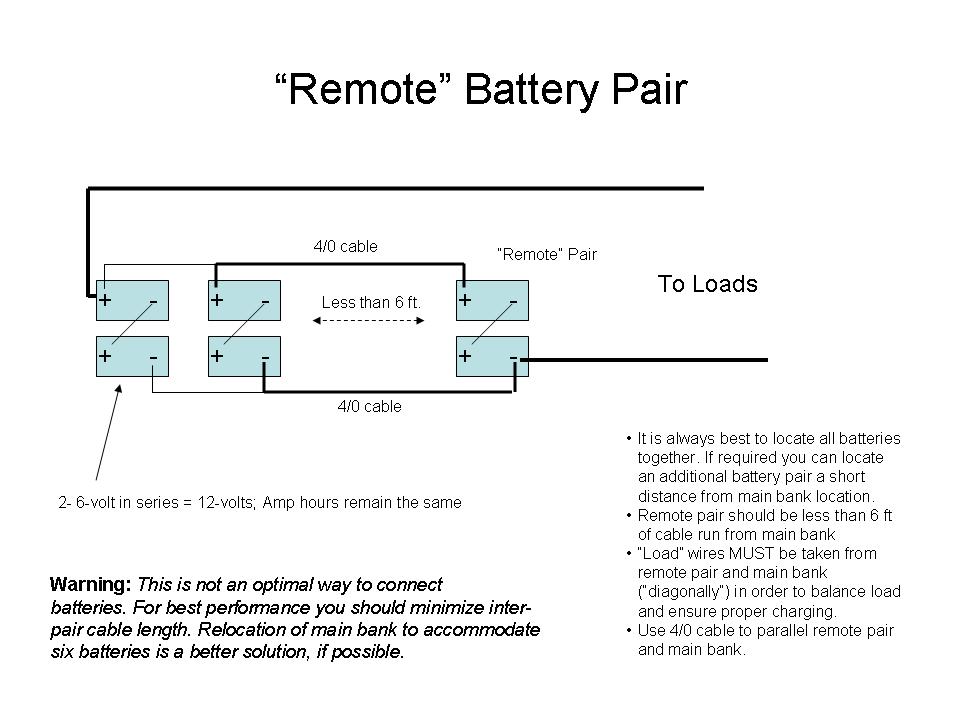 Sometimes, in order to build the size bank required, you are forced to
locate parts of the bank in different areas. While this is not
desirable, if there is no alternative it can be done as long as you keep
the distance between the batteries reasonable. For example, in our
Royals International 5th wheel the battery box will support four T-105
class batteries. So that is what I have. However, if I needed to add two
additional batteries I would place them just inside the nose storage
compartment next to the battery box (which is on a slide out tray with
an outside door). My inverter is also inside this nose compartment, on
the opposite side of the RV. Normally, you never put an inverter
in the same compartment with a battery bank because of the possibility
of explosion. In this example it is safe to do so because of the
separation and because this compartment also contains the genset, so it
has excessive ventilation. I would still put the extra two batteries in
their own box, and vent that box to the main battery box. Sometimes, in order to build the size bank required, you are forced to
locate parts of the bank in different areas. While this is not
desirable, if there is no alternative it can be done as long as you keep
the distance between the batteries reasonable. For example, in our
Royals International 5th wheel the battery box will support four T-105
class batteries. So that is what I have. However, if I needed to add two
additional batteries I would place them just inside the nose storage
compartment next to the battery box (which is on a slide out tray with
an outside door). My inverter is also inside this nose compartment, on
the opposite side of the RV. Normally, you never put an inverter
in the same compartment with a battery bank because of the possibility
of explosion. In this example it is safe to do so because of the
separation and because this compartment also contains the genset, so it
has excessive ventilation. I would still put the extra two batteries in
their own box, and vent that box to the main battery box.
Maintenance
Flooded-cell batteries require routine maintenance. This needs to be performed at least once a month. One of the advantages of gel and AGM batteries is that they are sealed units and do not require maintenance.
Following is the maintenance information provided by Trojan.
Specific Gravity Test
(Flooded batteries only)
9. Compare the readings. The readings should
be at or above the factory specification of 1.277 ± .007. If any
specific gravity readings register low, then follow the steps below. If any specific
gravity readings still register low then follow the steps below. 1. The battery is old and approaching the end of its life. 2. The battery was left in a state of discharge too long. 3. Electrolyte was lost due to spillage or overflow. 4. A weak or bad cell is developing. 5. Battery was watered excessively previous to testing. Batteries in conditions 1 - 4 should be taken to a specialist for further evaluation or retired from service.
|
|
|
|
||