|
Copyright
© 2002-2017 John Mayer. All rights reserved.
For reuse policy see Reuse Policy
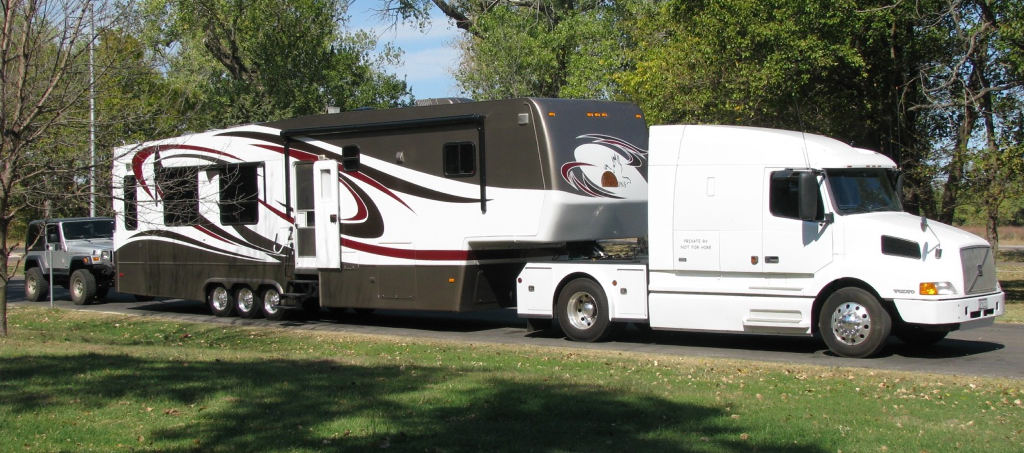
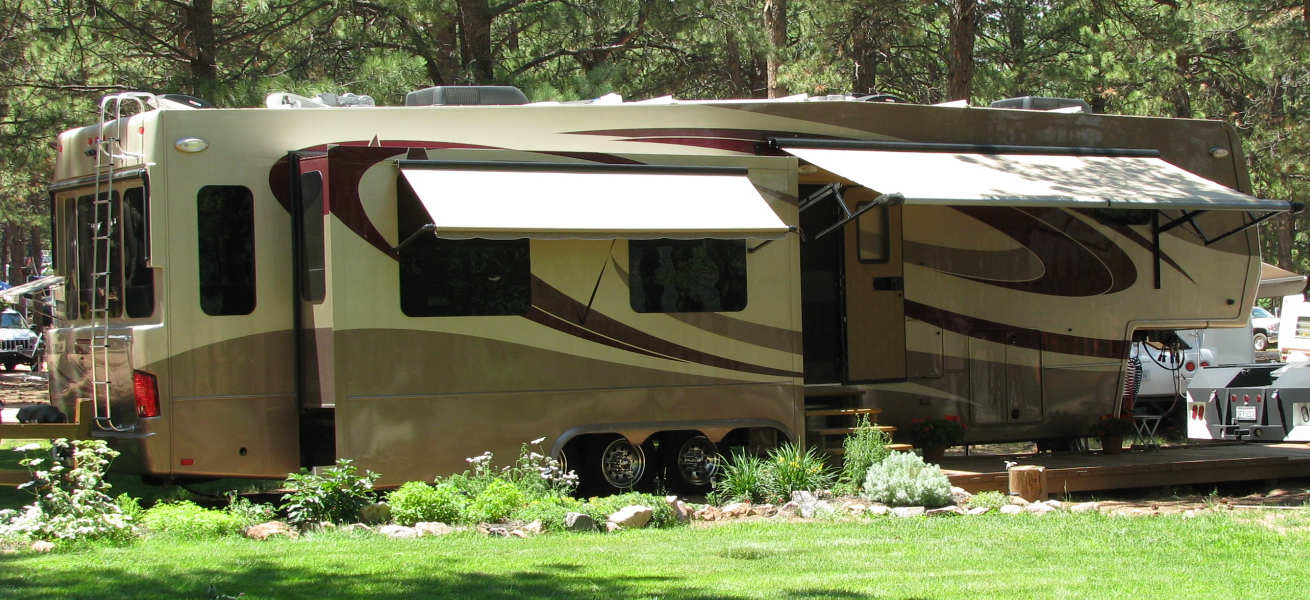
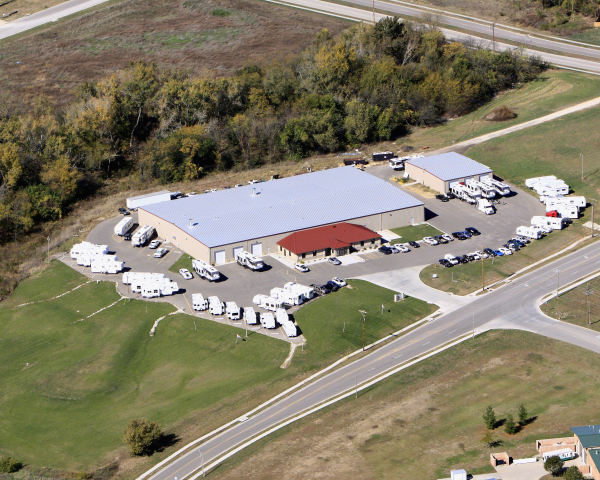
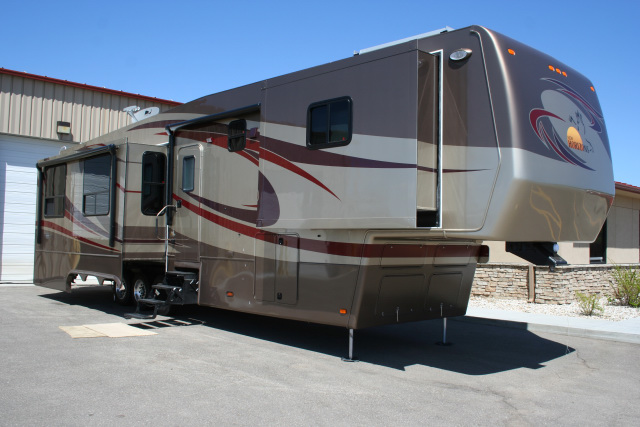
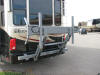
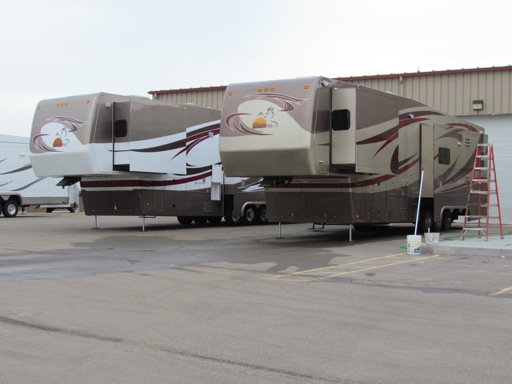
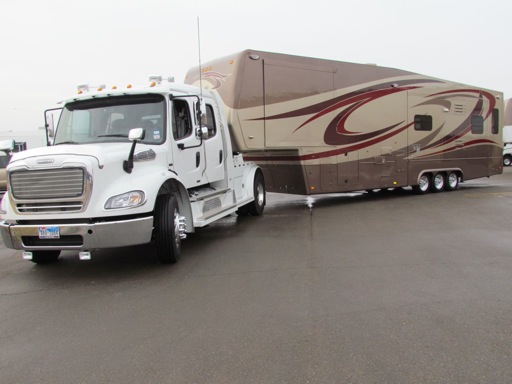
The picture at the top of the page (with
the truck) is our 2010 New Horizons. The picture immediately above is
our 2012 New Horizons with full body paint in Champagne.
In
late February 2010 we took delivery of a custom New Horizons fifth wheel. It
was by far the nicest RV
we have ever owned. We chose New Horizons after looking at all available
luxury 5th wheels. We feel that on today's market it is the finest 5er
available.
In the Spring of 2012 we
took delivery of our second New Horizons, a custom built 42.5' version
of our 2010 floorplan. We sold that unit in 2014 and built our current
coach - a heavily customized 2015.
The 2015 is a 44.5' variation on our 2012 model.
See the section below for 2015 information.
If you are looking for
a VERY NICE used New Horizons take a look at this 42' Majestic. This very nice coach
belongs to friends - we are very familiar with it. If looking for a used
coach it is worth looking at.
LINK
Pictures of our 2010 RV:
Being Built
Finished Interior
Revision of the cooktop
Pictures of our 2012 RV:
Being Built
Finished Exterior
Finished Interior
Pictures of our 2015 RV:
Being Built
There is a playlist of eight videos featuring the interior and exterior
of our 2015 coach
HERE.
Photos of the Dinette and Entertainment Center are
HERE.
A video tour of the New Horizons plant -
featuring our 2015 coach - is available
here. It is
about 30 minutes long.
In This Section:
 New Horizons RV is a family
owned and operated company located in Junction City, Kansas. New
Horizons builds custom 5th wheel RVs to order, and sells
factory-direct to the end customer. There are no “stock” models sitting
on dealers lots. Each and every 5th wheel is built with
customer input, exactly the way you want it. Although this is not unique
in the industry, it is pretty uncommon. Getting exactly what you want in
a luxury RV makes building your “dream rig” not only possible, but easy.
For over twenty years New Horizons has built quality RVs to customer
order – so they know what they are doing. New Horizons RV is a family
owned and operated company located in Junction City, Kansas. New
Horizons builds custom 5th wheel RVs to order, and sells
factory-direct to the end customer. There are no “stock” models sitting
on dealers lots. Each and every 5th wheel is built with
customer input, exactly the way you want it. Although this is not unique
in the industry, it is pretty uncommon. Getting exactly what you want in
a luxury RV makes building your “dream rig” not only possible, but easy.
For over twenty years New Horizons has built quality RVs to customer
order – so they know what they are doing.
Phil and Karen Brokenicky
acquired New Horizons in 2002 and immediately started expanding and
improving the product line.
Product Lines
The product line consists of
three types of fifth wheels and a travel trailer. The original design is called the Classic,
and is a more basic 96” wide model without molded end caps. This is the
original design of the RV, and has been built for over 20 years, with a
few modifications and modernizations along the way.
Shortly after Phil and Karen
took over the company they produced a newer version of the Classic
called the Summit. This modernized the décor, added molded fiberglass
endcaps, and some other technical advances – notably flush-floor slides.
But it remained a 96” wide model. In 2010 the Summit was modified to
include the ducted air conditioning that was developed for the Majestic
line. As improvements from the Majestic line are "pushed" into the
Summit it has become basically a "narrow body Majestic". You can build a
Summit that has all of the luxury features of the Majestic, but on a
frame that is more suited to a shorter coach.
In early 2009 New Horizons began
production of the prototype that was to become the flagship product
line: the Majestic. This prototype was first shown at The Rally,
in Albuquerque, NM in May of 2009. The Majestic was targeted at being
the finest luxury fifth wheel RV on the market. With the demise of Teton
and Travel Supreme the high-end luxury fifth wheel market needed a new
RV to fill the void, and the Majestic does so nicely. The Majestic is a
wide-body design, with fully ducted air conditioning and painted
graphics – differentiating it from the Summit line. There is now a
second version of the Majestic product line called a Majestic LM. This
is a lower cost Majestic that deletes some of the standard features of
the “full blown” Majestic. It enables one to get the Majestic advantages
without all of the cost associated with building the fully-featured
Majestic.
Either the Majestic or the
Summit line can be configured as a "toyhauler" - New Horizons calls a
toyhauler a MotoMover. Since all New
Horizons are custom units built specifically to the customers
requirements you can configure your garage any way you like it. Side
entry, rear entry, drive through, stackers, bunks, cabinets, hobby
rooms, wash-down options, dog kennels, 50' units, or even horses. These
units are FULLY custom, and your imagination is your only limit. To me,
although we do not have a MotoMover, the thing that truly sets the
MotoMover apart from the rest of the toyhauler units in the industry is
that you have a luxury, custom RV up front. Most of the other toyhaulers
on the market are - let me be gentle in my wording here - kind of
"basic".
Additional info on the various
models is available on the New
Horizons website. And New Horizons has a
YouTube "Channel" with videos of their units, construction process,
and other interesting info.
Why
New Horizons
After being fulltime RV’ers for
ten years we knew we would never own a house (sticks and bricks) again.
We always planned to one day build a customized Teton fifth wheel. We
stopped at the Teton factory once a year for many years to learn all we
could about them, and what we could do. We found that while Teton (in
its later years) would “customize”, the amount you could change the
product was somewhat limited. But we studied the possibilities; built
out our order sheets, figured out how/what we wanted to customize, and
waited….
We realized that the market was
passing us by. Teton was increasing the prices at a rapid rate – to the
point that we decided we would never own a new Teton; it was simply more
money than we were willing to spend on an RV.
We had always liked some of the
features of the Classic New Horizons, but to be frank, they simply were
not “current” enough for us in the décor and infrastructure features.
Things like flat floor slides, gel coat exteriors, molded end caps, wide
body chassis, and ducted air conditioning were required features – and
available on competing fifth wheels for less than the price of a New
Horizons. So, although New Horizons built a quality product it simply
did not meet all our needs when we first started considering building a
custom or semi-custom unit.
When Phil and Karen bought the
company and the Summit became available some of our requirements were
met, but we still wanted a wide body unit, and ducted AC. With the
launch of the Majestic, we finally had our needs met in a true custom
fifth wheel. But I was skeptical. Would it be the same high
build-quality as the past New Horizons, and would the factory continue
to do true custom builds or go the way of some of the other “custom”
manufactures and only do semi-custom. And, most important, could we
afford it?
In the year before buying our
New Horizons we had looked closely at all of the high-end manufacturers
still in the market. The Doubletree Elite Suite, Mobile Suite, Excel,
Spacecraft, Carriage Royals International (which we owned at the time),
and the Newmar Kountry Air were all RVs we looked at closely and
evaluated. None of them really met our needs well, and most of them
were priced in a range that was higher than was comfortable for us in a
“stock” unit. Doubletree would do some customization of their Elite
Suite, and Spacecraft, of course, is a true custom builder. But the
other manufacturers would do little or nothing to meet our specific
requirements. While we did not look at them, Travel Units also builds a
true custom rig.
Once we looked at the Majestic
prototype, saw the standard features, and found out it was still a true
custom unit we decided it was worth a factory visit. We were impressed
enough with what we saw at the factory to spec out a unit. With the
economy as it was at the time, the price was right for us and we placed
our order. The custom unit we built in 2010 was priced in the
same range as the
Elite Suite that we were looking at, once we optioned-up the Elite. While it may be spec’ed
similarly, it certainly does not compare from a technical perspective –
the New Horizon is a superior unit in almost every respect. And there
are things in our New Horizons that DRV would not do.
While that price comparison was
valid in 2009 when we ordered, since then DRV has lowered the price of
the Elite - to do that they took out standard features. Both an Elite
and a New Horizons in the same size and with comparable amenities are
expensive. As of 2012 the Elite Suite is the closest 5th wheel in the
luxury class to a New Horizons. Compare the features and materials
closely. A New Horizons costs more - but you get more for your money
in my opinion. Nevertheless, a New Horizons is an expensive purchase - but you do
get exactly what you want in a fully custom unit, with residential
appointments, appliances, and fitment.
Why is New Horizons a
"Better" RV
Well, the first question is
"Better than what?". I don't believe New Horizons has anything in
it that is compellingly "unique". You can find most of the features,
finishes and designs in another RV. With perhaps the exception being the
quality of the cabinet work - I've not seen anything that compares to
that in another towable RV. But otherwise, different RVs exhibit some of the
characteristics of a New Horizons. The difference comes in how many
of the higher-end features, materials and components are brought
together in a New Horizons. Plus the fact that it is truly a custom
built RV - built to your requirements, and incorporating the
materials you want. So, following are some of the things
that I believe makes the New Horizons a "better" RV. And this is before
any options or customization.
-
Full customization by the owner
-
Fit and finish is exceptional. High grade materials are used
throughout the RV
-
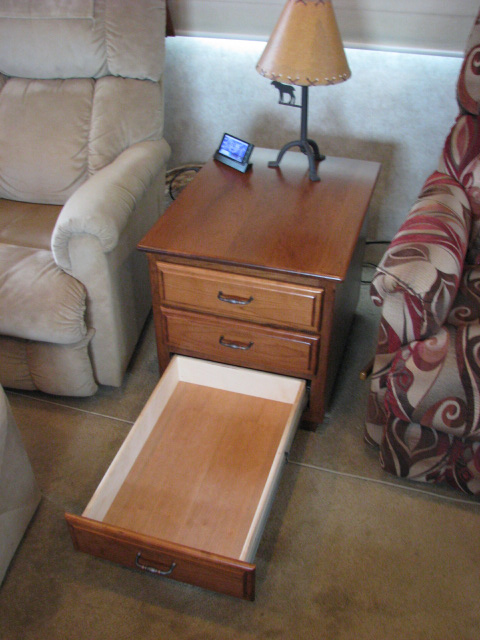
Furniture-grade cabinets constructed with pocket screws, fully finished
solid hardwood drawer boxes (not plywood), dovetailed corners, ball bearing (self
latching) drawer slides. These truly are what you would see in a
high-end custom residential application.
-
No particle board or staples are used anywhere in the RV (…well,
staples are used on the carpet…).
-
No plastic “fake wood” trim or corbels around slides – all solid
wood.
-
State of the art, robust frame; 12” I beam on top of 4”tubing.
Properly reinforced. Aluminum frame is available for weight savings.
-
Best available “running gear”; three axles, Mor/ryde IS suspension,
disc brakes, 17.5 H rated tires (on larger units).
-
A minimum of 3,000 lbs carrying capacity, even on smaller units. On
larger units up to 6,000 lbs carrying capacity.
-
Quadra Bigfoot automatic levelers with remote key fob and “hookup
height” memory.
-
Fiberglass roof – one piece, no seams.
-
Dual pane frameless windows.
-
29K Fabex pin box.
-
Keyless door entry.
-
2x 40lb propane bottles with gauges on slide - a slide that actually
works right.
-
12 gallon water heater with electric.
-
Drinking water filter.
-
High end porcelain toilet.
-
Multiplex lights with two pad locations.
-
Surge protector for 120v systems.
-
Available ABS braking. The only in the industry.
-
Laminated wall, ceiling and floor structure is exceptionally strong.
-
Standard
battery box can hold 6 batteries (or specify any size needed).
-
Air conditioners have condensate pumps so no water dumped on roof.
-
Full body paint.
-
Mostly residential appliances. (Refrigerators are RV unless optioned
as Residential.)
-
12.3 cf 4-door RV refrigerator
-
Largest basement height in the industry.
-
Residential flooring and carpeting.
-
Samsung 40” TV, Denon AV receiver with Boston Acoustics surround
speakers/powered subwoofer, DVD player
Of course, along with the
"better RV" comes a "better price". There is no denying that a New
Horizons costs more than most production RVs. But you get more as well.
Only you can make the tradeoffs required to decide if the superior
infrastructure, quality and
amenities are worth the extra cost. In our case, the RV is our only
"house". So we are willing to pay a "little" extra for the "lot" of
quality and amenities we get. Not everyone will come to that conclusion.
Also, let me note that I'm not
suggesting New Horizons builds "perfect" RVs. Although for the money
some would think they should be. All RVs are hand built. All RVs have
issues. See the Quality section for more of my "opinions".
Sales/Ordering Process
The sales process was
interesting and totally different than working with a “dealer”. Since
this is a family owned business, you have access to Phil (the owner).
One of his son's - Cole or Drew - will assist you with the ordering process.
Obviously, you are dealing directly with the factory – not a salesman
employed by a dealer. And there is no question which is answered with
“I’ll check on that for you”. Everyone knows what the factory is capable of, and
they know
how to get things done. Because you are building a custom rig you might
specify things that they have not done before – these issues get
resolved quickly, along with pricing. Their business model is “custom
build”, so they know how to address these issues, unlike a traditional
manufacturer. Here is how our order process went.
We arrived at the factory in our
Royals International on a Saturday. We plugged into their power and
water behind the service center (they service all brands of towable RVs,
and many things on motorized RVs). We connected to their wireless
Internet for our “surfing pleasure”. On Monday morning we met with Phil
for a factory tour. This took a couple of hours. We got to go inside any
of the rigs under construction, and Phil answered all of our questions.
Nothing I asked him stumped him – unlike other factory tours we have
taken. Phil is clearly proud of the new, modern factory they built and
he often does the tours himself.
After the tour Phil asked if we
were interested enough to spec out a unit. The only way to really know
what “your” unit will cost is to actually spec one out – but I was
hesitant to do this because we were pretty sure we could not afford what
we would “want”, and I did not want to waste his time. Surprisingly,
when I told him this, and that there was less than a 50% chance we would
be buying right now, the answer was “No problem, this is the way we do
business – we can spec one out so you can see what it would cost and
what you would get for that”. So we did. And we held nothing back – we
put on everything we could think of that we would want. This took the
rest of that day for the initial “swag” at our trailer. At the end of
the day we had basic CAD drawings, and a printed price list with
everything detailed. But this was just the START.
After considering the initial
order sheet and pricing we decided to go ahead and order a unit. It took
another two days to finalize our plans and all the details. Of course,
we kept adding things so the price adjusted (upward) some. By Thursday
we were ready to sign the order. While we did not work "all day" on the
order each of those days, it does take some time to properly design the
unit - depending on how much customization you want, and how much time
you previously have spent thinking through what you might want in a
custom coach. Don't cut your time
short if you go to the factory to order. Of course, you don't have
to go to the factory to order - they are very used to doing this from
afar. But if you can get to the factory you will find it
beneficial.
On a side note, it is unusual
for the CEO of a company - even a smaller manufacturer like New Horizons
- to directly participate in the order process like Phil did with us.
More typical would be to work with Cole, Drew or another Product Specialist. We were honored that Phil took
the time to get to know us, and he is, of course, always available to
any of his customers.
Standard Features
The Majestic comes with many
more standard features than most high line 5th wheels, so be
careful when you compare. For example, Bigfoot (by Quadra) hydraulic
leveling is standard on a New Horizons. This allows for bi-axis leveling
with four hydraulic jacks. The rig is automatically leveled at the push
of a button. The jacks can also be used to lift the entire coach off the
ground, for tire changing or other situations where getting the wheels
up is convenient.
There are a number of things
that make the Majestic, well, majestic…
Like all modern coaches it has a
wide body design. With its 6’8” bedroom one-level height it has more
bed/bath headroom than any other 5th wheel. This makes it
possible (for example) to delete the standard skylight in the shower if
you wish, since there is enough headroom for most people. In other
coaches, tall people need that skylight space in order to shower. Why
would you want to do that? Well, the skylight lets in lots of heat and
cold if you are not always in temperate climates.
The front storage compartment
(the “belly”) is very large – 42” tall gives you lots of room for items.
Unlike other RV manufacturers,
New Horizons builds almost all the chassis components and interior
elements in-house. Each frame is built from scratch specifically for the
coach that you help design. So it is easy to add a foot (or two or
three) to any area of the coach. Any special features that require frame
modifications can be easily accommodated. Need a special ride height? No
problem. Want the bedroom 2’ longer? No problem. Axles are positioned as
appropriate for YOUR rig and its weights. If, for example you intend to
carry a motorcycle on a rear lift, the axles will be biased towards the
rear to account for the extra weight.
From the beginning New Horizons
has been well known for the quality of its cabinets. Until mid-2012 all cabinets
were
built in-house in their state-of-the-art cabinet shop. Starting in 2012
the cabinet doors and drawer boxes have been outsourced to a high-tech
robotic factory. This has resulted in a superior door and drawer to what
was seen in the past. The quality and finish, as well as strength are
far superior to most cabinets seen in RVs and rival high-end residential
cabinetry. All cabinets are still custom to the rig being built - they
are made to order. And there is still the ability to build cabinet doors
totally in-house when appropriate - like for last minute fixes or
changes. Frames are still built in-house. I was skeptical of this change
since the New Horizons cabinets have always been a superior part of the
coach - but I believe that the new doors are as good or better than what
was built in-house.
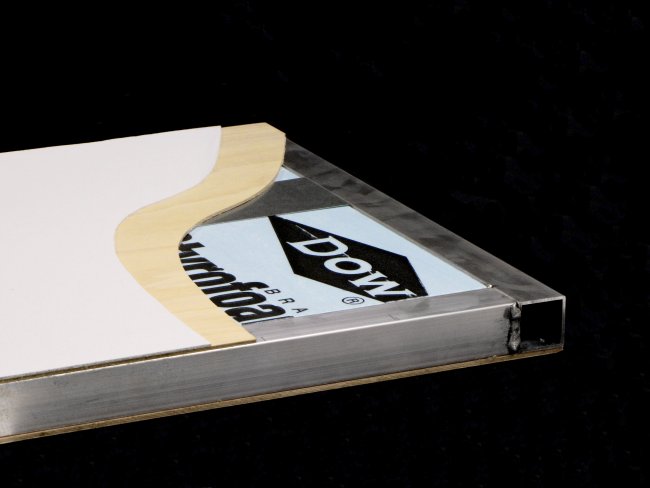
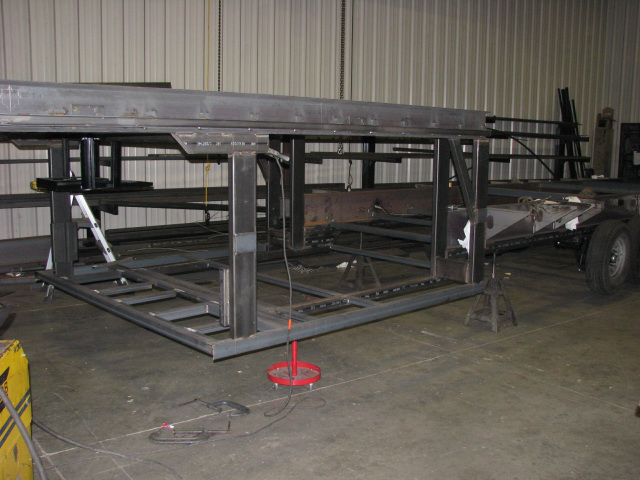
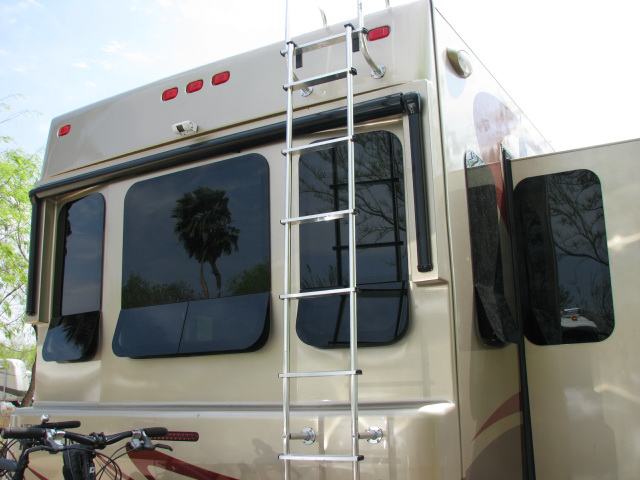
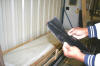
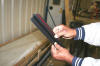
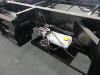
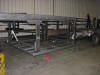
  The pinch-rolled
laminated exterior walls
are constructed of blue Dow polystyrene (like that used in walk-in freezers)
framed with aluminum. A continuous film of adhesive is used to bond the
exterior surfaces to the aluminum and polystyrene, resulting in an
incredibly strong structure. Just walk on the roof of a New Horizons and
you will feel the difference from other RVs. This same technique is used
for all sides of the slide out rooms - including the floors. This gives you superior insulation
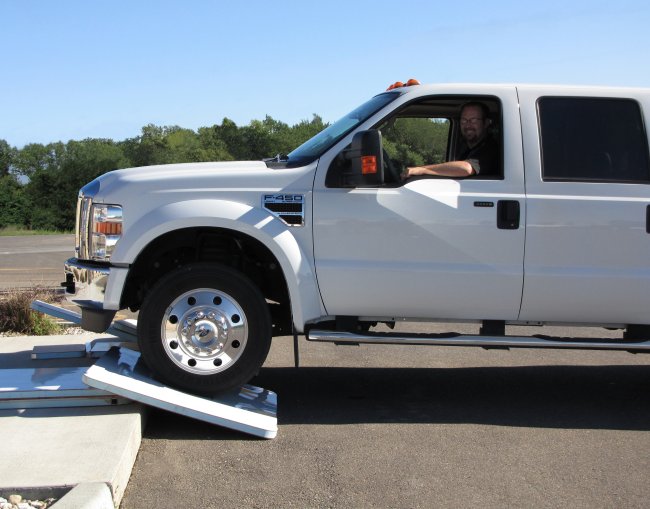
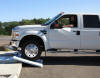
in the slide outs – uncommon elsewhere. In the picture to the left, that
is an F450 using a wall section with no aluminum framing in it as
a ramp. The pinch-rolled
laminated exterior walls
are constructed of blue Dow polystyrene (like that used in walk-in freezers)
framed with aluminum. A continuous film of adhesive is used to bond the
exterior surfaces to the aluminum and polystyrene, resulting in an
incredibly strong structure. Just walk on the roof of a New Horizons and
you will feel the difference from other RVs. This same technique is used
for all sides of the slide out rooms - including the floors. This gives you superior insulation
in the slide outs – uncommon elsewhere. In the picture to the left, that
is an F450 using a wall section with no aluminum framing in it as
a ramp.
The main thing about the
pinch-rolled walls is that the rest of the design does not negate the
advantages of it. Electrical and plumbing is designed to NOT penetrate
the exterior wall structure. Outlets are in cabinets or in corner chases
in the slides. This way full insulation integrity is maintained, and
more importantly, sources of draft are eliminated. This keeps the
interior space especially comfortable.
Other standard features include:
-
Mor/Ryde IS suspension –
arguably the best suspension in the industry. We like it better than
air suspension.
-
Low
profile air conditioners.
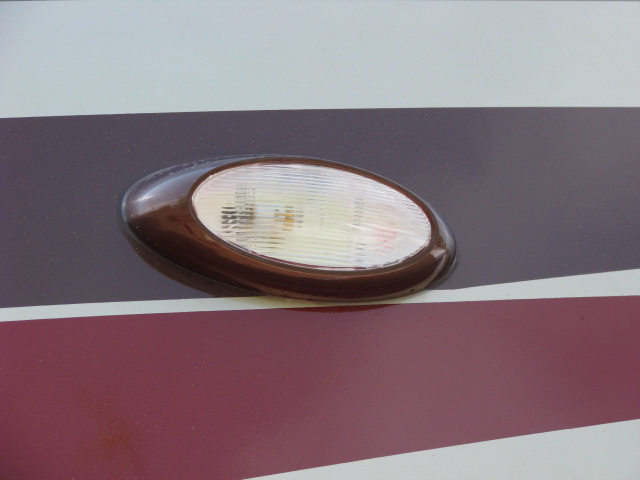
-
LED lighting on
the exterior
-
Full-body painted exterior with two
coats of clear.
-
Electric awning
-
12.3 cu. Ft.
refrigerator
-
Dual two-stage
furnaces in 40’+ rigs (which are incredibly quiet)
-
Residential
sinks, faucets and shower valves
-
Residential-quality china toilet
-
40” Samsung
1080p HD TV with Denon
surround sound A/V receiver and Boston Acoustics 5.1 surround sound.
-
Double pane
tinted windows (of course). These are frameless.
-
12” pillow top
mattress
-
Multiplex
LED lighting
-
Accent lighting
throughout the living area
-
39” curved-front
shower, with two doors that roll to the side (no leaving water on
the floor when you open a swinging door)
-
Laminated,
pinch-rolled exterior walls, roof, and floors provide superior
insulation and draft free interiors. The slides are insulated in the
same fashion. Did you know that on most other RVs that the slide
floors are not insulated?
-
Central water
manifold with “home runs” to each fixture provide maximum control
over the water system. The outside central hookup area provides
convenience and ease of utility management
-
100 gallon fresh water tank
-
12 gallon water heater
-
70 gallon grey tank
-
70 gallon
black tank. This tank is specially constructed with a
sloped-to-the-outlet floor, and the outlet is actually set lower
than the bottom of the tank. This assures full drainage of the tank,
unlike many other vendors black tanks where the outlet is actually
1/4" to 1/2" above the floor line.
-
The black tank
washout is not a single spray device like on most other rigs – the
black tank has a tube that runs into it that has multiple spray
outlets on it. This significantly improves the cleanout.
Standard Features For 2012
-
Full-body paint with full
clear coat (two coats of clear)
-
Frameless windows are a
no-cost option. Your choice - framed or frameless.
-
Exterior satellite
connection in utility center with HD capability
-
Skid rollers
-
The Quadra Bigfoot automatic
levelers have been upgraded to use a system with a key fob remote.
The system also remembers where your trailer hookup point was, so it
is easy to get back to that for hooking up when you leave.
-
Dimmers on the multiplex
lighting
-
Slide heights 6' 8"
-
Remote keyless entry
-
Rope lighting in bedroom and
living area
-
40" Samsung HDTV
(SmarTV)
-
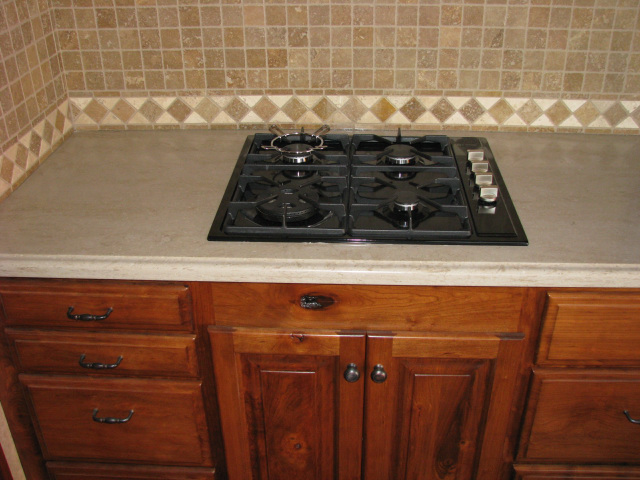
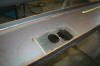
If you order just a cook top
(no oven) then the Verona residential cook top is standard. Shown is
the black Verona in an extended-counter kitchen (in a 48' unit) with
doors under (with rustic cherry wood cabinets). Two drawers are standard under the cooktop. Normally, you would only have a few inches to the left of the
cooktop - the size of this particular unit allowed the kitchen to be
extended.
Normally, you would only have a few inches to the left of the
cooktop - the size of this particular unit allowed the kitchen to be
extended.
-
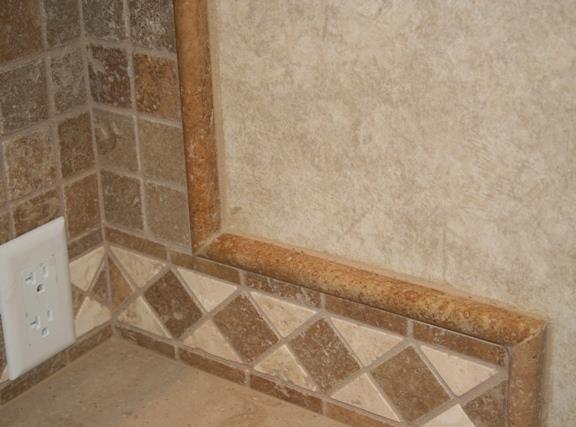
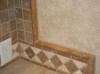 Tile-work
edges are now tile pencil trim instead of wood. This is a much nicer
look, in my opinion. Tile-work
edges are now tile pencil trim instead of wood. This is a much nicer
look, in my opinion.
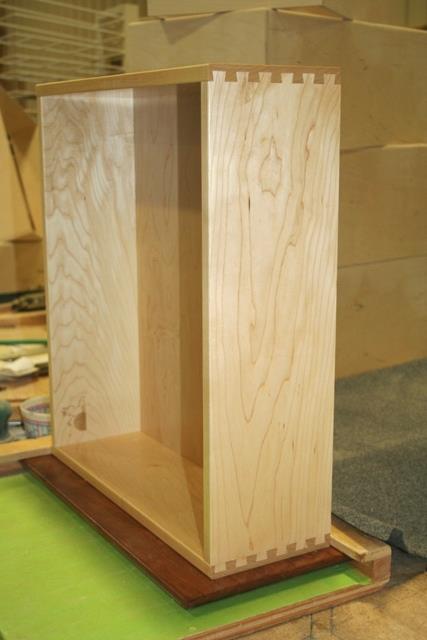
-
 The cabinet drawers have been totally reworked. They are now maple
boxes, with dovetailed corners, totally finished with poly. This is
an outstanding drawer box. Actually better than a high-end
residential kitchen cabinet. It is hard to believe that New Horizons
could improve on their cabinets - but they have.
The cabinet drawers have been totally reworked. They are now maple
boxes, with dovetailed corners, totally finished with poly. This is
an outstanding drawer box. Actually better than a high-end
residential kitchen cabinet. It is hard to believe that New Horizons
could improve on their cabinets - but they have.
-
The roof is upgraded to 4"
of blue Dow polystyrene (two 2" layers). This is up from the
two 1.5" layers previously used and brings the roof
to an R-25. The AC ducts have a full 2" of polystyrene on top of
them. This is very effective in keeping the air cool and adds to the
AC efficiency.
-
 Air Conditioners are switched to Coleman. The new model from Coleman is a quieter AC
unit, and it has higher volume airflow that the Dometic (or the
original Carrier units). It is
substantially quieter. Air Conditioners are switched to Coleman. The new model from Coleman is a quieter AC
unit, and it has higher volume airflow that the Dometic (or the
original Carrier units). It is
substantially quieter.
-
The air conditioner ducts
are re-profiled for better airflow, thus better cooling, and a
quieter interior. They are not quite as "flat" as they were, since
the thicker roof allows for a taller profile. This was designed in
conjunction with the Coleman AC engineers to maximize the
effectiveness and quietness of the new Coleman AC units.
-
Fully ducted return air for
the air conditioners also results in a quieter interior and more
efficient cooling.
-
Air conditioner condensate
will be collected via a captive system where condensate is collected
by the AC unit and then pumped via a closed-pipe system within the
roof and down the inside of the back cap to the ground. (The pipe
goes down between the back cap and the rear wall.) The result is
that in warm climates where you use the AC a lot you will not have
condensate collect on the roof and/or run down the front/rear caps.
This is a closed system directly integrated into the AC unit, so
there are no issues with clogging, and nothing is visible either on
the roof or within the rear cap.
-
 There are new slide seals with double wipers.
These also have longer wiping faces so they are far more effective
at both sealing and wiping.
There are new slide seals with double wipers.
These also have longer wiping faces so they are far more effective
at both sealing and wiping.
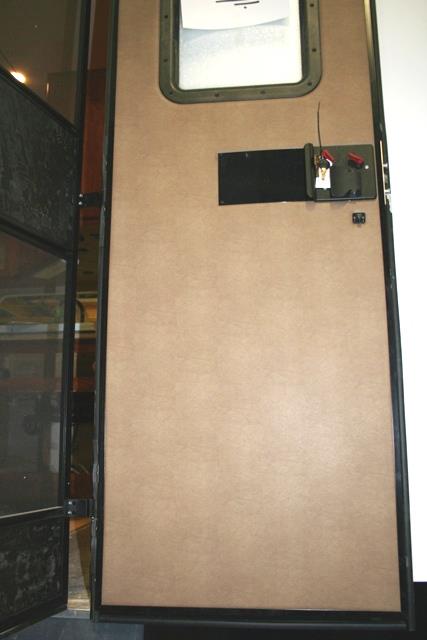
-
 The entry door has been totally re-worked. There is now a
black screen door and the main door trim is black. This better
coordinates with the rest of the coach; especially if you have the
new black frameless windows. The inside portion of the door is also
covered in the same padded vinyl material as the inside ceiling
headliner.
The entry door has been totally re-worked. There is now a
black screen door and the main door trim is black. This better
coordinates with the rest of the coach; especially if you have the
new black frameless windows. The inside portion of the door is also
covered in the same padded vinyl material as the inside ceiling
headliner.
-
As an industry first, you can get Anti-lock
brakes on a New Horizons.
Tuson is the
supplier. It does require that your tow vehicle use their
proprietary controller - the entire system is called DirecLink. You
can see a YouTube video
here.
There are at least four videos in this series....look at the other
videos from them as well as this one.
-
Wall insulation values are increased to R-14, and
the floor is R-28.
2013 Features
Various features and changes are
made during the model year, as well as introduced for the new model year
coaches. Some of the features I've listed below are actually changes
that were introduced late in the 2012 model year production, but have
not been documented elsewhere. New
Horizons constantly includes improvements in their production run; they
do not always wait until the next model year. Items listed here are (of
course) subject to change/improvement and are available on units after
the 2013 "show model".
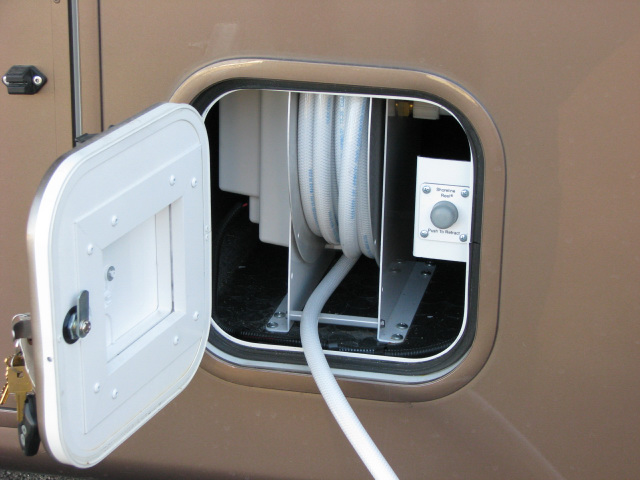
Utility Hookup Center
The water and sewage hookup
centers are combined behind one long door for ease of access. The sewer
area is divided from the water area internally for safety. If the
optional powered water reel is ordered it is also behind this central
door, along with sewer hose storage tube(s), an isolated storage area
for sewer adaptors and parts, water hookup bibs and flush bibs, tank
flush valves, fresh water tank fill valve, etc. All behind one central
door, lower in the skirt so as to not "waste" space in the floor area of
the coach. This area is heated. A grey water flush is standard, along
with the existing black flush. There is also a single knife valve where
the sewer cap goes on. This protects against a "surprise" when removing
the sewer cap if a valve is leaking at the black or grey tanks.
Cabinets, Trim and Lighting
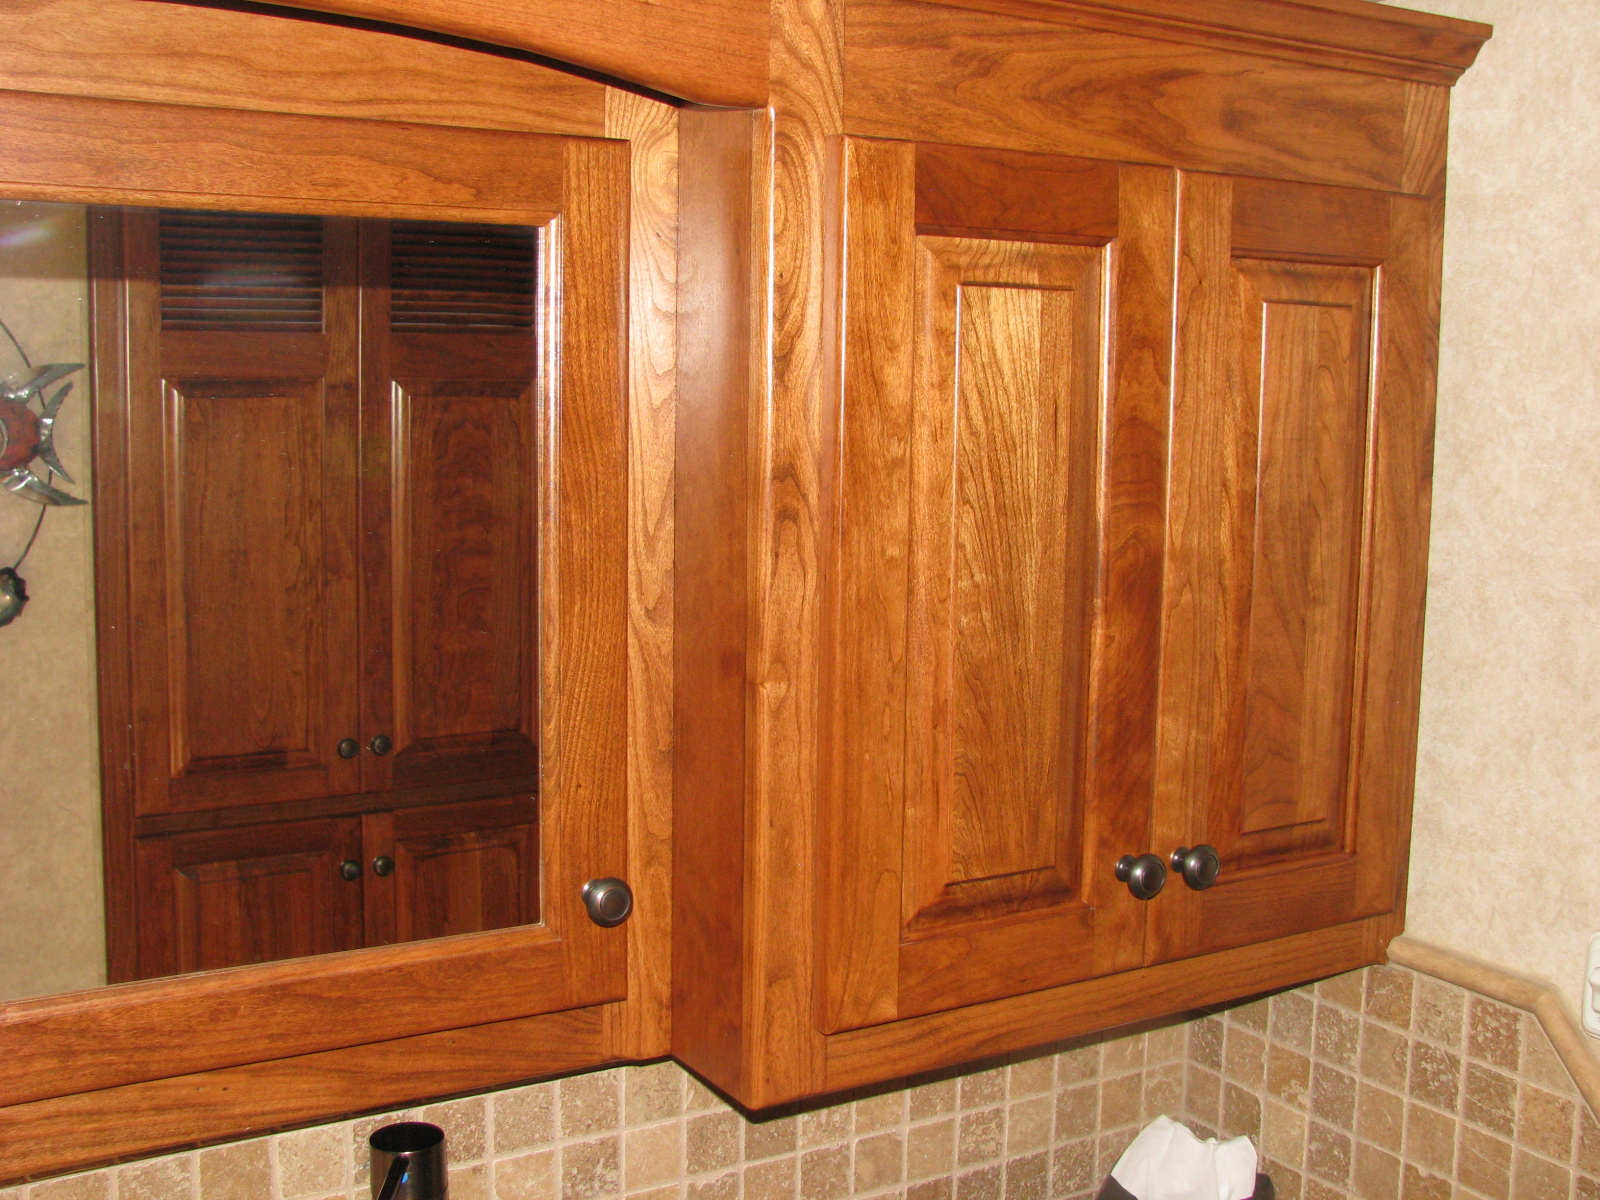
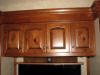 Upper
cabinets now have an arch in the raised panel. All cabinet doors have a
"table edge" edge profile instead of a round-over profile (not shown in
this picture). These changes dress up the cabinets quite a bit. Upper
cabinets now have an arch in the raised panel. All cabinet doors have a
"table edge" edge profile instead of a round-over profile (not shown in
this picture). These changes dress up the cabinets quite a bit.
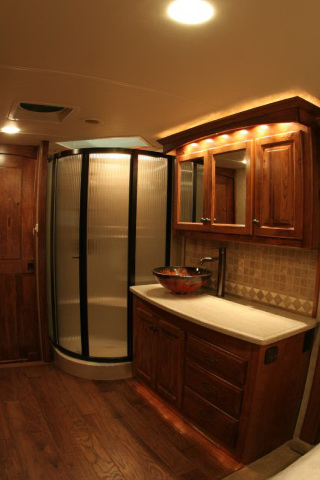
 The
bathroom medicine cabinet has been redesigned on coaches with the larger
bathroom. There is a 9" deep cabinet on the right side of the medicine
cabinet that gives far more storage. On our 2012 coach (shown) we put an
electric outlet inside this cabinet for our electric toothbrush, and we
had the countertop outlet mounted under the cabinet instead of on the
tile surface - we think this provides a "cleaner" look. The
bathroom medicine cabinet has been redesigned on coaches with the larger
bathroom. There is a 9" deep cabinet on the right side of the medicine
cabinet that gives far more storage. On our 2012 coach (shown) we put an
electric outlet inside this cabinet for our electric toothbrush, and we
had the countertop outlet mounted under the cabinet instead of on the
tile surface - we think this provides a "cleaner" look.
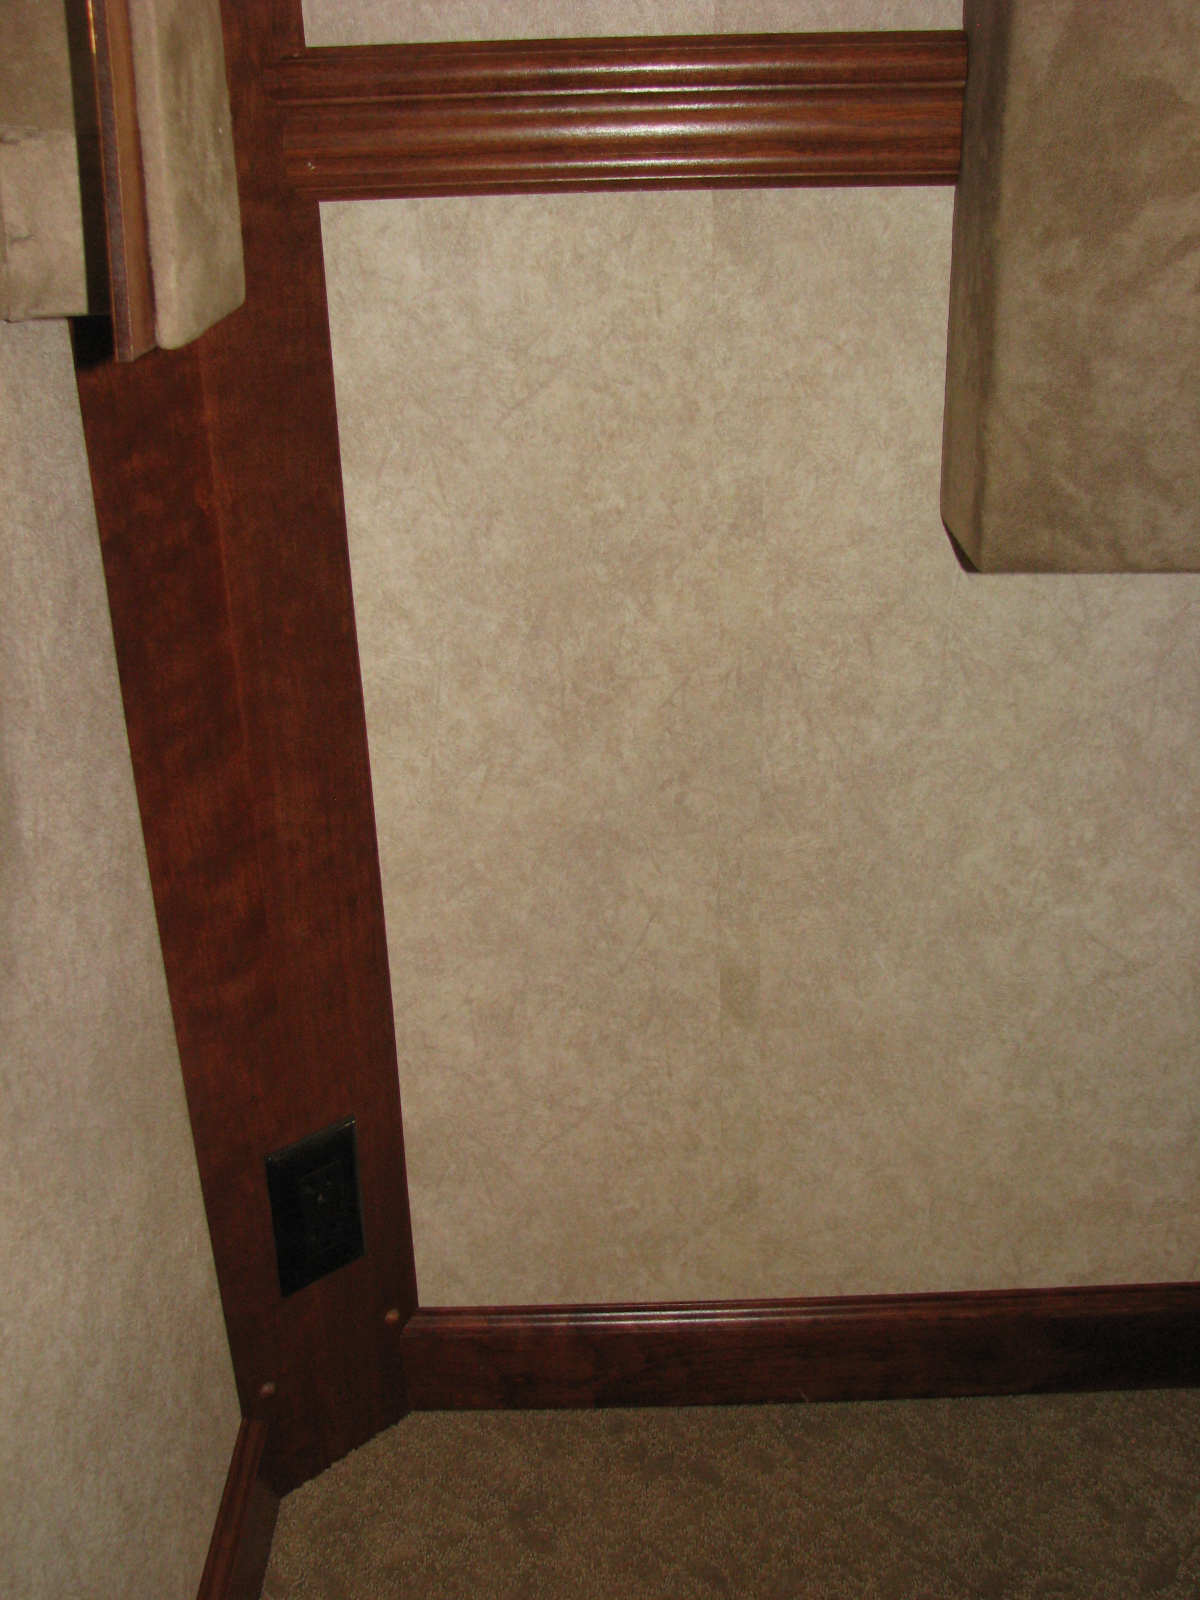
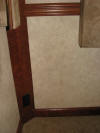 There
is baseboard trim throughout the coach, with optional chair rails and
wainscoting or raised panels. The wallboard is available in two colors and is used in
conjunction with the wainscoting to create a very elegant look. The
first picture shows simple baseboard and chair rail. You can also
specify raised panels between the chair rail and baseboard - shown in
the album
here. There
is baseboard trim throughout the coach, with optional chair rails and
wainscoting or raised panels. The wallboard is available in two colors and is used in
conjunction with the wainscoting to create a very elegant look. The
first picture shows simple baseboard and chair rail. You can also
specify raised panels between the chair rail and baseboard - shown in
the album
here.
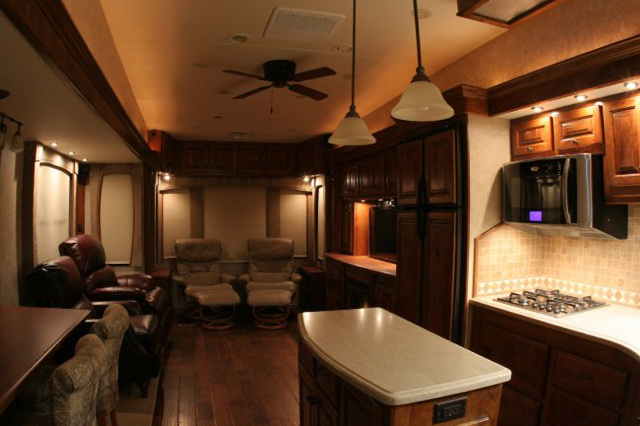
All halogen lights are replaced
with standard LED lighting which is dimmable. The "ceiling of light"
(florescent) over the kitchen area is deleted and replaced with standard
pendent lighting over the island, and an extra in-ceiling LED light. The
pendants are mounted from a wood medallion on the ceiling. Floor
lighting in the bedroom, steps, toilet room and bath area are LED.
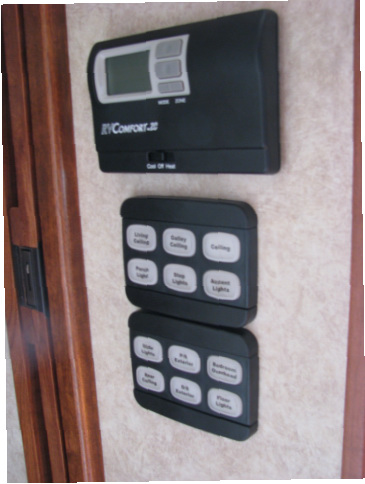
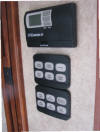 The
multiplex light control panel is replaced with an easier to see (and
use) model. This is a very nice improvement from a usability
perspective. "Older" eyes have a hard time reading the original
multiplex console. However, if you leave the floor lights on at night
your bedroom multiplex console is going to stay lit all night....and
believe me, it is bright. I'm experimenting with modifications to
the LEDs now, to see if I can dim it down a little. New Horizons is
working with the manufacturer to see what options there are for
correcting this. In the meantime, simply leaving the bedroom cabinet
door open next to the light panel (over the lights) corrects the issue.
(Note: the ultimate resolution is to simply remove the floor lights from
the multiplex pad - which is what we did.) The
multiplex light control panel is replaced with an easier to see (and
use) model. This is a very nice improvement from a usability
perspective. "Older" eyes have a hard time reading the original
multiplex console. However, if you leave the floor lights on at night
your bedroom multiplex console is going to stay lit all night....and
believe me, it is bright. I'm experimenting with modifications to
the LEDs now, to see if I can dim it down a little. New Horizons is
working with the manufacturer to see what options there are for
correcting this. In the meantime, simply leaving the bedroom cabinet
door open next to the light panel (over the lights) corrects the issue.
(Note: the ultimate resolution is to simply remove the floor lights from
the multiplex pad - which is what we did.)
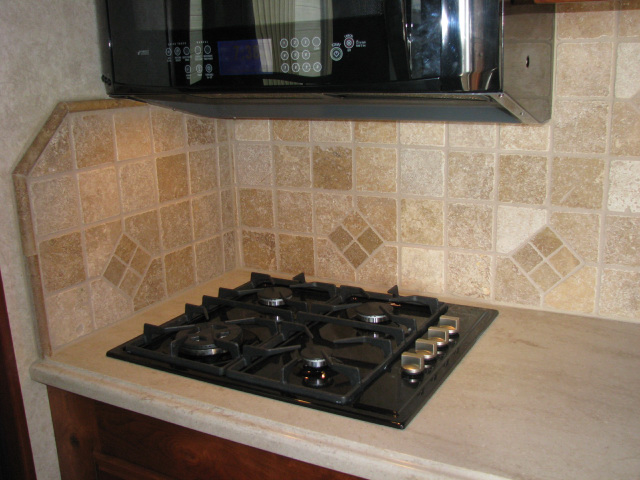
Kitchen
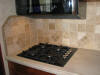 The
new sink with Corian counters is an under mount quartz sink in a dark brown color (replacing
a stainless steel sink). If you order optional granite that comes with a
standard stainless sink. The
tumbled marble backsplash is redesigned in a larger 4" tile, with accent
tile inserts. The picture shows the standard Verona residential 4-burner
cook top in black with the new tile. Stainless may be used as well, depending on
availability. The
new sink with Corian counters is an under mount quartz sink in a dark brown color (replacing
a stainless steel sink). If you order optional granite that comes with a
standard stainless sink. The
tumbled marble backsplash is redesigned in a larger 4" tile, with accent
tile inserts. The picture shows the standard Verona residential 4-burner
cook top in black with the new tile. Stainless may be used as well, depending on
availability.
 Granite
countertops are optional. You can also use granite on the entertainment
center top, the bedroom end table tops, the bedroom vanity top, and the
bath countertops. The lighter granite is used on the kitchen countertop
and island countertop - the darker color is used everywhere else. Shown
with the granite are the new wall covering styles. Granite
countertops are optional. You can also use granite on the entertainment
center top, the bedroom end table tops, the bedroom vanity top, and the
bath countertops. The lighter granite is used on the kitchen countertop
and island countertop - the darker color is used everywhere else. Shown
with the granite are the new wall covering styles.
Entertainment
A Denon audio/video receiver is
standard, along with Boston Acoustic surround sound speakers and powered
subwoofer. This is a true A/V receiver, unlike the previous Samsung
"surround" receiver. All components are selected from, and routed
through, the Denon.
The optional exterior
entertainment system is moved from below the dining room window, to
inside the main storage compartment.
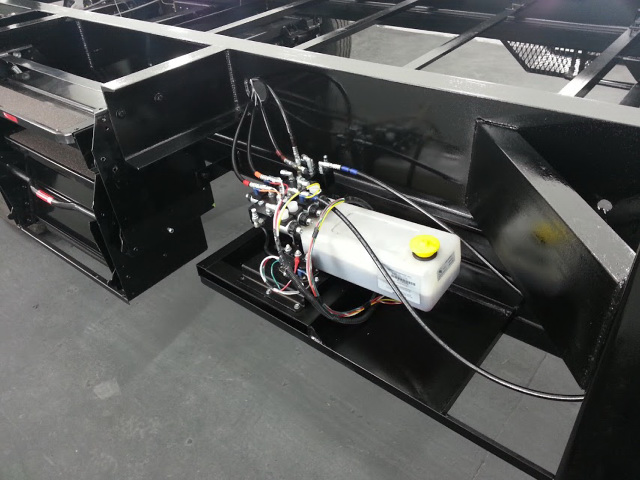
Miscellaneous
 The slide hydraulic
pump/manifold have been
moved from the front storage compartment (above the genset) to the
skirting area just in front of the entrance door. This frees up storage
space in the main storage compartment. The slide hydraulic
pump/manifold have been
moved from the front storage compartment (above the genset) to the
skirting area just in front of the entrance door. This frees up storage
space in the main storage compartment.
The generator (if optioned) is
behind the fresh water tank under the living area. This frees up the
generator compartment for additional storage. There is lots of space to
access the generator and perform maintenance.
A low profile 13.5 btu Coleman
air conditioner (the MACH 8) is used in the bed/bath area (upper deck). This brings
the overall height of the coach down several inches. See the
Towing section for some discussion of coach
height.
In the toilet room, the fan is
replaced with a MaxxFan with wall controls. The wall controls simplify
use and convenience. This fan has an integrated rain cover and can be
fully utilized in rain.
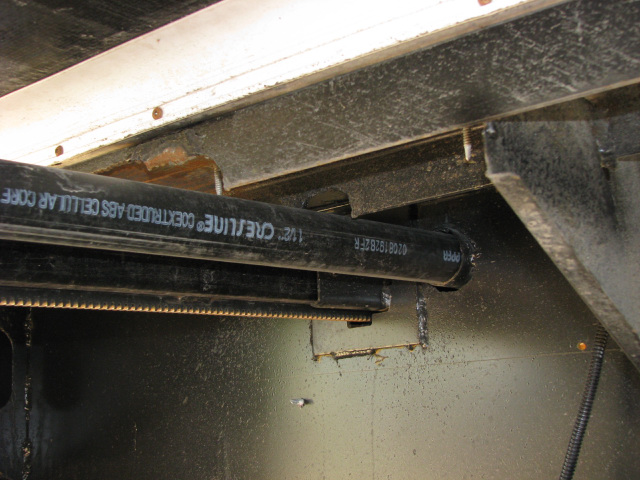
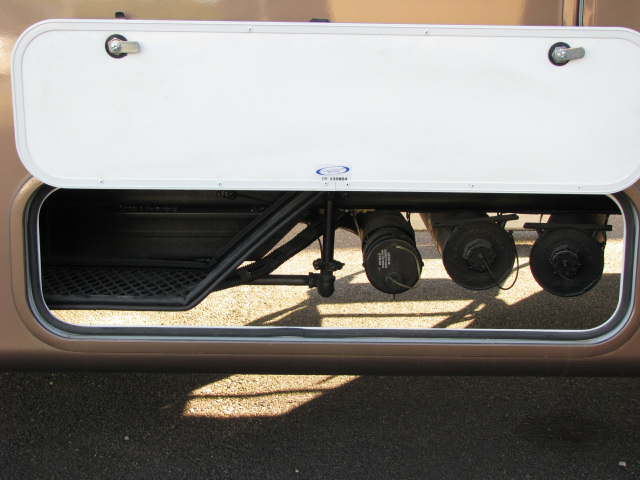
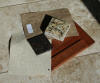
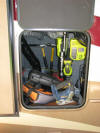 An
additional large storage compartment is available under the toilet room.
This provides quite a bit of additional storage even though the sewer
line from the toilet goes thru the space. In smaller coaches this is
standard, on larger coaches it is optional. It is a perfect place to put
two whole-house water filters. You see mine on the left, full of tools.
It is about 3' deep, but can vary depending on the coach. An
additional large storage compartment is available under the toilet room.
This provides quite a bit of additional storage even though the sewer
line from the toilet goes thru the space. In smaller coaches this is
standard, on larger coaches it is optional. It is a perfect place to put
two whole-house water filters. You see mine on the left, full of tools.
It is about 3' deep, but can vary depending on the coach.
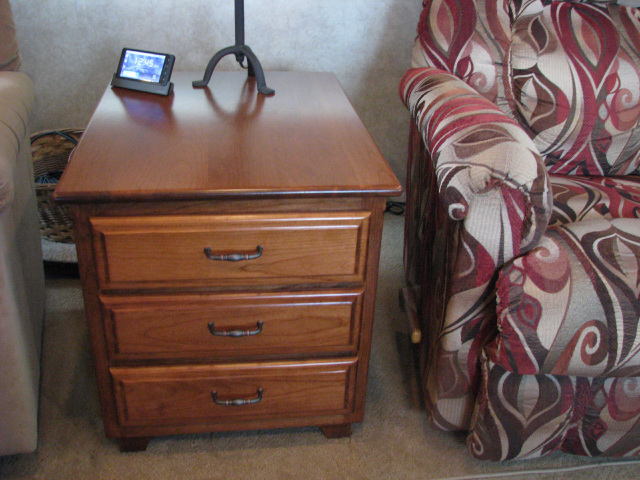
The bedroom end table tops now
"wrap" forward and around the slide trim. This provides for far more
usable space and is a nicer look - especially in granite.
 Reinforcement
and structural changes have been made to the frame. Additional gussets
have been added to the upper deck, and the C-channel upper deck main
members have been changed to box tubing with 1/4" walls. See the
Frame section for more discussion. Reinforcement
and structural changes have been made to the frame. Additional gussets
have been added to the upper deck, and the C-channel upper deck main
members have been changed to box tubing with 1/4" walls. See the
Frame section for more discussion.
 The
Quadra Bigfoot automatic leveling system "feet" are set at a
2.5 degree
angle. This provides for better stability, although I'm not sure how
much better you can get - our coach does not move much at all. (Note:
the picture shows a coach with 5 degrees angle, newer coaches have 2.5
degrees.) The
Quadra Bigfoot automatic leveling system "feet" are set at a
2.5 degree
angle. This provides for better stability, although I'm not sure how
much better you can get - our coach does not move much at all. (Note:
the picture shows a coach with 5 degrees angle, newer coaches have 2.5
degrees.)
Insulation
Questions about insulation are
common. New Horizons uses high density blue Dow Corning polystyrene
throughout the coach. This is one of the best available
polystyrene products on the market - and has better insulation
properties than the white polystyrene some other manufacturers use. There is
lots of discussion about the "best" way to insulate an RV. Many
manufacturers use either wool or fiberglass batt insulation - like that
used in a house. The claim is that it is "residential" so it is better.
But consider that a house does not move down the road. The issue with
batt insulation is that it can sag and pull loose over time, no matter
how it is installed. This
compromises the insulative properties of the batt. This is a common
problem noted on DRV coaches. Batt insulation is
also more prone to permitting air infiltration than a laminated
polystyrene structure. Laminating the walls, ceiling and floor results
in a structure that is both strong and impervious to air infiltration by
its nature. One of the biggest issues with using batt in an RV wall is
wall size. RV walls are not the thickness of residential construction,
and compressing the batt results in considerable loss of R-value. So an
R-14 batt compressed beyond its specifications is not performing at an
R-14 value.
Air infiltration is really more
of an issue in comfort in an RV than the max R-value of the insulation.
R-value alone is not sufficient - you have to also make the coach
"breeze free". Every hole cut in the structure is potential air
infiltration. Use of double pane frameless windows helps a great deal,
since sliders never approach the performance of frameless windows.
Consider the fact that the frameless window is closed down onto a seal.
A slider runs in a track with "hair like" bulbs providing the only seal
in many locations. I can tell you from personal experience that the
frameless windows perform at a level above sliders, are easier to keep
clean, and allow as much air circulation when used with a fan. They are also a superior look.
The New Horizons lamination
process is complimented by not cutting holes into the walls
unnecessarily. All electric and plumbing is run in chases - not cut into
the wall. Outlets are placed in built-out corners, or in the underside
of cabinets, instead of in walls. Also, the lamination technique
eliminates much of the aluminum wall studs, while enhancing strength,
thus minimizing cold conduction into the interior.
New Horizons maintains
insulation properties in the floors of their slides. They are
constructed with the same lamination process as the walls. Some
other RVs greatly compromise the insulation in the slide floors, or in
some cases have NO insulation in the slide floors.
The roof is R25 - it contains
two layers of 2" foam. All the supply AC ducts have 2" of insulation on
top of them, to minimize heat intrusion from the roof into the ducts.
This enhances the performance of the air conditioning units and in hot
weather provides a noticeable difference in interior comfort.
The walls have 1.5" of
polystyrene and are around R14.
The floor is R-28. It consists
of the laminated structure with 5/8" single sheet birch plywood on the
interior (with no seams), polystyrene insulation and a heated tank
space. Below that is more insulation with Astrofoil. This a proper use
of Astrofoil. Astrofoil requires air space to obtain the most in
insulation - compressing it in walls is not an optimal use of it's
properties.
Along with the windows, an
important factor in minimizing air infiltration are the slide seals. The
triple slide seals on the New Horizon greatly reduce air infiltration.
But there is still some. In my opinion, it is less than most other RVs
in the industry. I'm very pleased with the performance of our 2012
coach. It is warm, and it has virtually no inside air movement in windy
conditions. It is far better than other RVs I have owned, or been in. Is
it perfect - no. But it is very comfortable even in cold conditions. We
usually only heat with the fireplace until we are down in the low 30's
for a longer period of time.
Frame
 I
get a lot of questions about the frame structure. To the point I wonder
why people are "frame obsessed".....I suppose it has to do with all the
issues manufacturers have with their frames. There are lots
of cracked or damaged frames in the RV industry. There are also many
slide and leveling problems induced by less-than-robust frame structures
and designs. One of the easiest places for manufacturers to save money
(or increase their margin) is by cutting costs on the frame. The frame
is obviously made of steel, good frame structures are
expensive to build, and there is little design savings - the cost of the
steel is substantial and relatively fixed. If a manufacturer wants to
save money, it is tempting to do so in the frame. So I suppose I do
understand why some are obsessed with the frame. I
get a lot of questions about the frame structure. To the point I wonder
why people are "frame obsessed".....I suppose it has to do with all the
issues manufacturers have with their frames. There are lots
of cracked or damaged frames in the RV industry. There are also many
slide and leveling problems induced by less-than-robust frame structures
and designs. One of the easiest places for manufacturers to save money
(or increase their margin) is by cutting costs on the frame. The frame
is obviously made of steel, good frame structures are
expensive to build, and there is little design savings - the cost of the
steel is substantial and relatively fixed. If a manufacturer wants to
save money, it is tempting to do so in the frame. So I suppose I do
understand why some are obsessed with the frame.
 New
Horizons builds their frames in-house (with the exception of the
aluminum frame, which is designed for the specific coach in-house but
welded to-order in a specialty frame shop). Each frame is custom built
for the particular coach that the customer designs. The frame on the Majestic is
claimed to be the best in the industry; other manufacturers also claim
this, and it is a hard thing to prove. But the Majestic frame is
certainly one of the best in the industry, if not the best. It is based
on a 12" I-beam structure. This provides the best vertical load carrying
capacity of a single piece of steel. It allows for the large frame
structures that custom RVs like a Majestic often require. There is a
reason why bridges are built from I-beam based designs. They are superb
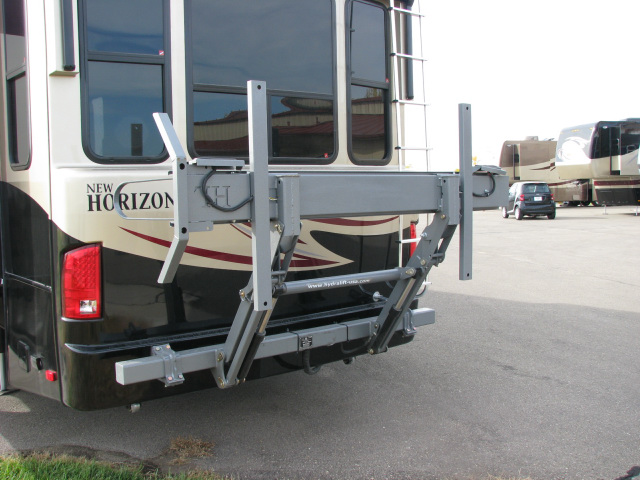
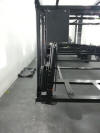
at weight carrying. Take a look at the
Hydralift
on the back of the New
Horizons to the left. This lift itself weighs around 500 pounds. It is
rated for an 1100 pound motorcycle. (It is shown in its "stowed" or
folded position.) This lift simply bolts onto the RV. No frame
modification is required. Don't try this with your average RV! By the
way, the Trike lift would also work fine. New
Horizons builds their frames in-house (with the exception of the
aluminum frame, which is designed for the specific coach in-house but
welded to-order in a specialty frame shop). Each frame is custom built
for the particular coach that the customer designs. The frame on the Majestic is
claimed to be the best in the industry; other manufacturers also claim
this, and it is a hard thing to prove. But the Majestic frame is
certainly one of the best in the industry, if not the best. It is based
on a 12" I-beam structure. This provides the best vertical load carrying
capacity of a single piece of steel. It allows for the large frame
structures that custom RVs like a Majestic often require. There is a
reason why bridges are built from I-beam based designs. They are superb
at weight carrying. Take a look at the
Hydralift
on the back of the New
Horizons to the left. This lift itself weighs around 500 pounds. It is
rated for an 1100 pound motorcycle. (It is shown in its "stowed" or
folded position.) This lift simply bolts onto the RV. No frame
modification is required. Don't try this with your average RV! By the
way, the Trike lift would also work fine.
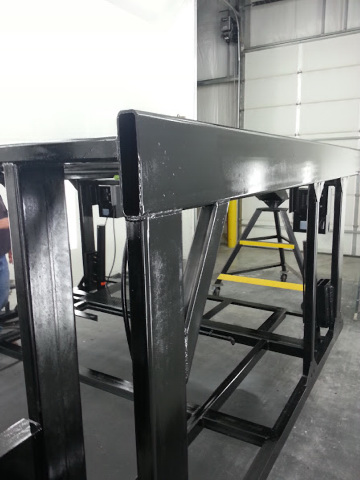
To augment the 12" I-beam, New
Horizons uses a 4" box beam (tubing) welded to the underside of the
I-beam. The purpose of this it to provide a basis for the "ladder"
structure that provides lateral rigidity to the frame. The 4" tubing
under both sides of the beam are cross-framed (joined together) with 2x2" tubing to
form a "ladder" structure, and the entire "ladder" is welded to the
I-beams. This provides great rigidity to the frame as well as enhancing
the vertical load carrying capacity. The total vertical "beam" height is
thus 16", made up of a 12" I-beam and a 4" tube joined as a single
structural component.
 So, why not "C" channel or a box
beam (structural tubing) for the main support structure? They are simply not as strong
for the same amount of steel, and when
building a custom coach at up to 48' you want the additional strength of
the I-beam. Using the
beam/tubing combination gives you the best of both products attributes:
great lineal strength from the beam, and great lateral stability from
the tubing. For the long runs cantilevered to the rear from the axles on
larger RVs that is what
you want. It costs more, but it works better. The upper
deck (bed and bath) is also supported by 1/4" wall box tubing
(picture below). So, why not "C" channel or a box
beam (structural tubing) for the main support structure? They are simply not as strong
for the same amount of steel, and when
building a custom coach at up to 48' you want the additional strength of
the I-beam. Using the
beam/tubing combination gives you the best of both products attributes:
great lineal strength from the beam, and great lateral stability from
the tubing. For the long runs cantilevered to the rear from the axles on
larger RVs that is what
you want. It costs more, but it works better. The upper
deck (bed and bath) is also supported by 1/4" wall box tubing
(picture below).
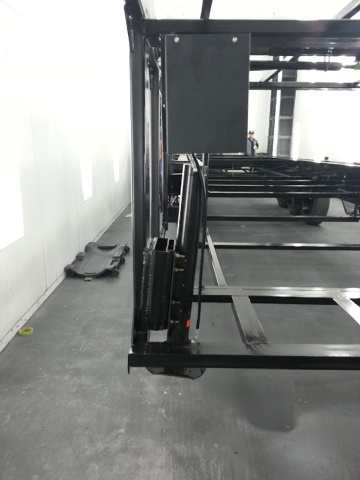
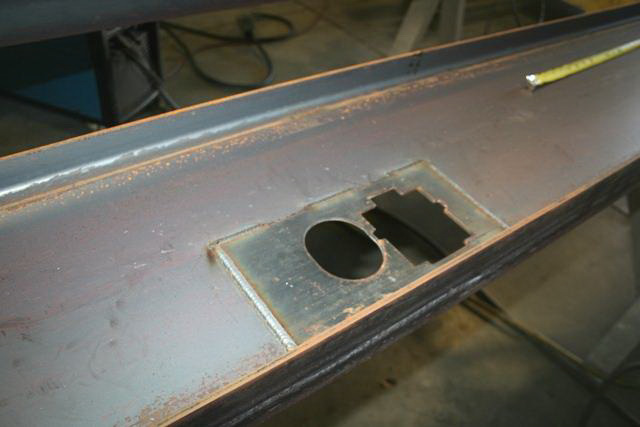
 Another frame-related question I
get a lot is how are the slide rails and hydraulic rams related to the
frame. As is common in the industry, these penetrate the I-beam. Some
think this is a structural flaw, but one of the virtues of using I-beams
is that this does not weaken the vertical structure when properly
reinforced. New Horizons reinforces each penetration with a
substantial plate welded to both sides of the I-beam around the
penetration. This results in no structural weakening of the I-beam. With
an I-beam - unlike a C channel or tubing (sometimes called a "box
beam" by marketing departments) - you can do this. That
is why I-beams are often used in quality RVs. In pictures to the left
you can see the slide arm; the hole next to it is for electrical lines
in the slide. They are in a tube to protect them and for a neater
appearance. Another frame-related question I
get a lot is how are the slide rails and hydraulic rams related to the
frame. As is common in the industry, these penetrate the I-beam. Some
think this is a structural flaw, but one of the virtues of using I-beams
is that this does not weaken the vertical structure when properly
reinforced. New Horizons reinforces each penetration with a
substantial plate welded to both sides of the I-beam around the
penetration. This results in no structural weakening of the I-beam. With
an I-beam - unlike a C channel or tubing (sometimes called a "box
beam" by marketing departments) - you can do this. That
is why I-beams are often used in quality RVs. In pictures to the left
you can see the slide arm; the hole next to it is for electrical lines
in the slide. They are in a tube to protect them and for a neater
appearance.
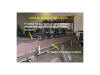
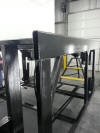 The
picture to the left shows the bed/bath area looking forward from the
entry door area (upper deck). There
is an album with additional pictures of
some frames
here. There is commentary on the pictures. The
picture to the left shows the bed/bath area looking forward from the
entry door area (upper deck). There
is an album with additional pictures of
some frames
here. There is commentary on the pictures.
Paint
Left Picture, Painted Graphics with end-wall wrap, Right Full Body Paint without
end-wall wrap
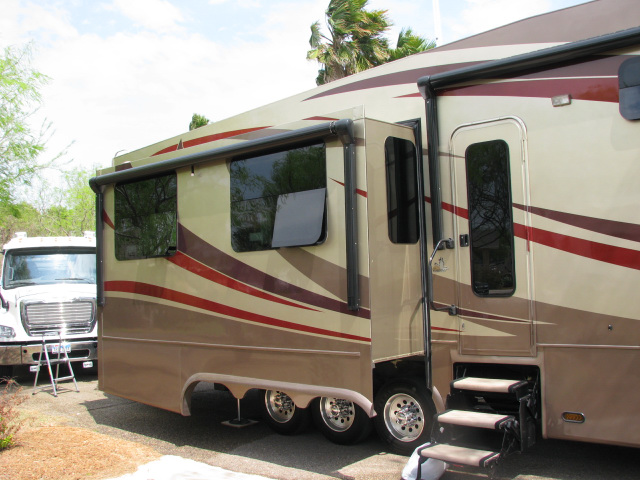
Full Body Paint
The graphics on all Majestic's
are painted on, and then clear coat is applied over top of the entire
rig - including the white gelcoat. Until February 2011 that was
all done in-house. Now, the paint for all units is outsourced to
Carrera Designs,
Inc in Forest City, IA. This provides for a superior result - CDI is
well known for the quality of its work. They paint for Excel, Spacecraft and
Winnebago, among others.
As of 2012, with CDI now
painting the rigs, the paint has been upgraded to two coats of clear
over
full body paint (with an additional two coats of clear an option). As an option, the graphics can be "wrapped" around the
sides of the slides. You can see that effect on the Majestic without the
full body paint in the top picture. Note how the darker brown and the
maroon stripe wrap the side of the bedroom slide. The full body paint
Majestic next to it does not have the optional graphics on the bedroom
slide - but it does have the base color on the slide ends.
The picture of the black/gold
full body paint is a 42' unit with rear kitchen. It has the paint
wrapped around the slide ends.
If you would like to download
PDFs of the various body designs/colors these PDFs will show you the
official layouts. They are all over 1MB downloads.

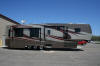

Our
2010 New Horizons Customizations
Note:
the floor plan shown is our 42' unit. We started with the 39' floor plan, and expanded
it
in the areas that suited us.
We did not customize our rig as
much as some people do. We have seen many examples of 100% customization
of a Majestic – ours is based on a standard floor plan (the 102-39RLTSS)
walk-thru bath model with three slides. We did not add the fourth slide in
the bedroom, since we felt we did not need the extra walk around space,
and it greatly cuts into the storage. If you plan on the 4th slide you
need to fully understand the ramifications on bedroom storage.
The 39RLTSS had the layout we
prefer, but not the space (length). Thus, many of our customizations
were based on stretching the rig and filling the additional length. The
standard model is 39’ long; we added 2’ to the bedroom/bath area, and 1’
to the living area.
Bed/Bath Area
This “stretch” of the bedroom
area by two feet resulted in several things:
-
We put a “king bed”
space/slide into the bedroom, but used a queen bed. This gives us
the two additional feet, which gives space for 1’ end tables
flanking the bed
-
We reduced the bath
sink/vanity area to 36” wide, and added a 19” full-height closet
next to the sink. The 36” vanity is sufficient, and the closet gives
us far more usable storage than a comparable wider vanity area
would. This works for us, but many people would like the extra-wide
vanity area.
-
We deleted the second
sink/vanity in the toilet room and replaced it with a full-height
linen closet with shelves. The closet is divided into two sections
and accessed from the toilet room. Accessing it from the sink area
would have required slide-out shelves to fully utilize the space –
and that would have wasted additional space and taken away a wall
area in the main room. On that wall you can put towel racks, or
decorative items – we have a wall sculpture hung there.
-
The wall of storage in the
bedroom (where the window and cabinets are) is much longer. It
provides significantly more clothing storage that the shorter
bedroom. Putting this area in a slide cuts the space quite a bit, so
we did not consider the fourth slide (second bedroom slide). There
is sufficient “walk around” room without another slide. For us,
anyway.
Our other
customizations in the bed/bath area were:
-
Additional floor lighting at
the base of the cabinets across from the bed. This allows us to see the dog at night, as
well as making it easier to get to the toilet room in the dark. I
put red LED lights in these. That cuts down on night blindness from
white lights.
-
We had cabinets built above
the bed instead of decorative shelves.
-
A custom headboard was built
with fabric inserts (neutral). We can change the décor in the
bedroom without worrying about matching materials. The standard
all-wood headboard also allows for changing décor easily.
-
We had outlets put in the
lower bed “box” so items on the bedside tables could be plugged in
without unplugging them when the slide is brought in. It also
provides a place to plug in electric blanket, if desired, or an air
mattress.
-
To maximize under bed
storage we did not put drawers under the bed. Some people do that,
and it does make access easier. We would rather maximize space.
-
We added an outlet alongside
the sink. We should have added two. We also added an outlet
alongside the bedroom vanity (at the foot of the bed by the escape
window).
-
We had a lift-top vanity
area made in the wasted space under the bed-vanity top (under the
escape window). This stores random junk.
-
We put in the 39”
granite-finish shower. The 39" shower is standard - but we
added the granite finish, which does not show spotting as much as a
plain finish.
-
Added the designer-bowl sink
(vessel sink) with the tumbled marble backsplash.
There are not many options in
the bed/bath area (other than our customizations):
-
Splendide separates
washer/dryer. We LOVE our washer/dryer. It is always a tradeoff on
storage or washer/dryer, but in a rig this size we do not really
sacrifice much storage. We have empty space! Doing it over again, I
would seriously consider a propane dryer instead of the 120-volt
electric dryer. It would be more efficient. They do not use much
propane, so that is not a consideration. We are very satisfied with
this set-up, though. The dry time on a full load of T shirts and 2
pairs of jeans is 100 minutes. That seems long if you are used to
residential dryers on 240 volt service, but it is actually pretty
good for a 120 volt dryer.
-
The sink and tumbled marble
backsplash were options.
-
The granite-finish shower
was an option.
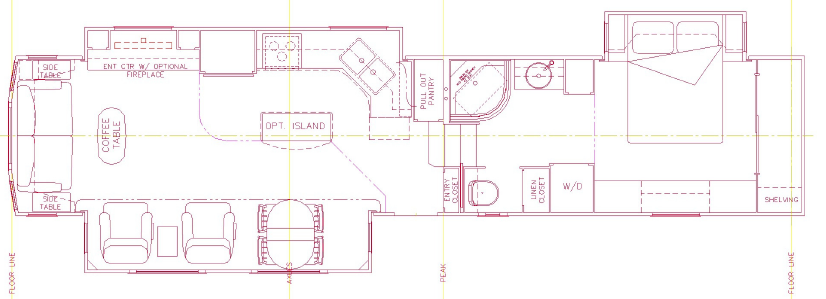
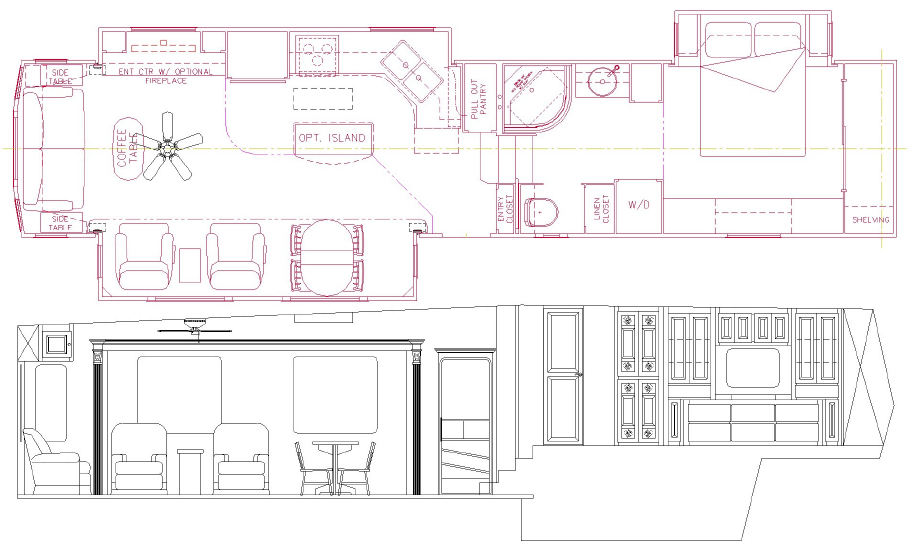
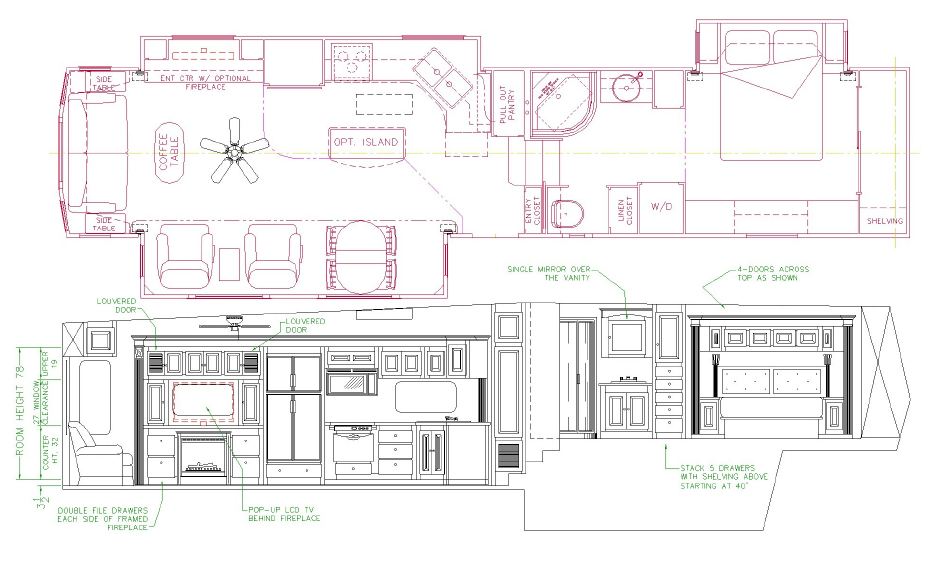
Living/Kitchen Area
The changes in the living area
were again driven by the one foot stretch. The stretch here was caused
by the desire to have a larger entertainment center to fit in a
fireplace and flanking file drawers. In order to make the area look
“balanced” with the file drawers we wanted to stretch it some. In
hindsight we would do things a little different and likely stretch the
living area two feet, instead of one.
-
The entertainment area was
totally redesigned by Danielle. She stretched it 1’, added a window
in the center, put the standard 37” TV on a lift instead of behind
doors (in order to have the window), and put a fireplace in front
of the TV. She flanked the fireplace with four file drawers. In
hindsight, we should have left out a file drawer and replaced it
with some smaller drawers. We should also have put a small
full-width drawer over the fireplace. Although that would change the
“look”, it would be worth it for storage of small items.
-
We added an extra outlet in
the top part of the entertainment center. We should have added one
in the middle cabinet, where we ended up placing our multi-function
printer, but it was easy for me to drill a hole through to a side
cabinet. We also should have added an outlet to each of the side
cabinets as well.
-
The reason for adding an
extra foot (over the one we did add) would be for furniture
placement. We deleted all the standard chairs/sofa and bought Lazy Boy
furniture. The couch area at the back of the rig (in the back window
area) is only deep enough to take a 39” couch (for slide clearance).
This is a very difficult size to find. We ended up with a Lazy Boy
sleeper, which is nice, but adding 6” to this area would make more
standard furniture available. The additional 6” would go into the
entertainment center, and across from it, the seating area. Adding 6
more inches to the entertainment center would enable putting in a
46” or larger TV and still maintain the side cabinets for the
“furniture look”. This would bring the overall rig size to 43’.
Note: once you get over 38’ or so, the additional length does not
really affect where you go much.
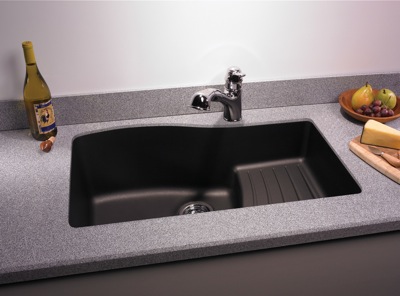
-
We added a larger (deeper)
custom sink. This sink is now standard.
We did not customize much else
in the living area. We did add a number of listed options, like:
-
Whirlpool Velos convection/speedcook
microwave. This works great and we do not need an oven with it.
-
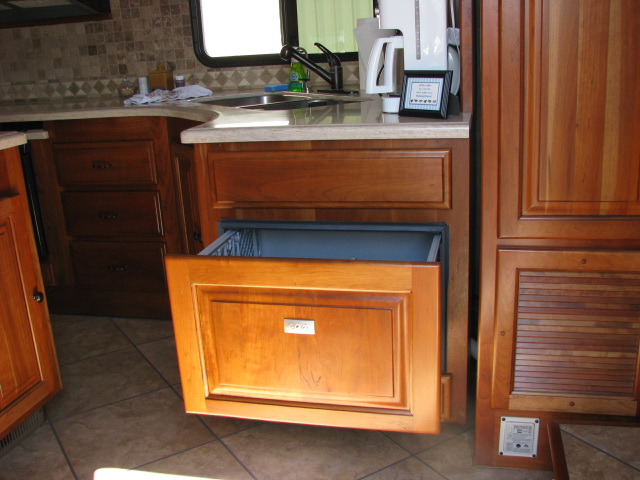
Dishwasher drawer in place
of the oven. This is one of the best things we added, other than the
washer/dryer. It uses 1.9 gallons of water to wash a load. I use
more than that in the sink, washing by hand. I know, because I
measured it. Ours is under the cooktop, where the oven would be. An
alternative location is at the end of the counter to the right of
the sink, facing the exit door. This frees the entire area under the
cooktop for large drawers. This is perhaps a better use of space.
-
Center island (with
additional outlets)
-
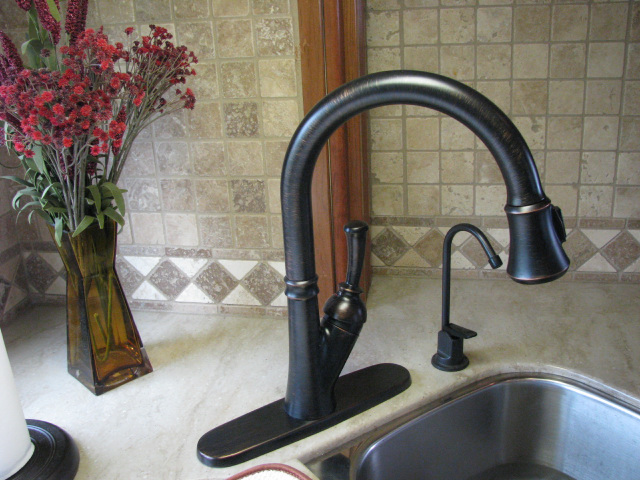
Tumbled marble backsplash.
This is a very nice looking backsplash and does not collect grease
or cause cleaning issues.
-
Bronze fixtures and hardware
throughout the rig.
-
MCD motorized night/solar shades on
every window in the living area, with manual solar shades throughout
the rig. The bedroom night shades are manual. They are easily
reached on the three windows in the bedroom, so motorized shades
would be a waste of money in our opinion.
-
I had an extra outlet and
12-volt power added to the upper cabinet by the door. I put all our
communications equipment there – cellular router, amplifier, wifi
extender, Ethernet switches, NAS, etc. I also had the rig wired with
Ethernet cable from this point outward. Ethernet is on the roof (for
wifi extender), in the outside utility cabinet, and over to the
entertainment center. All of this “stars out” from the coat closet
“communications area”. In retrospect, I should have put an
additional Ethernet line over to the seating area. I can easily add
this, though.
-
The standard refrigerator is
the new Dometic 12.3 cf RV refrigerator. We deleted the icemaker.
This gives us a lot more room in the freezer. I have to say I am
impressed with this new refrigerator – it works flawlessly, and
keeps ice crème solid. We considered a small residential
refrigerator, but we boondock enough that it would not be as
practical for us.
-
In
the lighting department we added a few dimmers and the kitchen
“ceiling of light” large florescent fixture, but other than that we
have standard lighting – which is excellent. I recommend that the
lights over the couch be on dimmers, though.
-
We put in the Winegard
Trav’ler open-air HD automatic rooftop dish to provide HD service
for our entertainment center. We use DirecTV, but it is available
with either service. This is the best dish available, in my opinion.
And well worth the money.
-
We have the optional coffee
table, and three end tables (two are standard). Two end tables flank
the couch, and one is between our Lazy Boy recliners. I’d like to
get a custom end table between the recliners to better utilize the
space and create more storage. Some people have built fixed cabinets
flanking the couch, and this is a good option to consider.
Infrastructure
I’ve lumped together all the
chassis, systems, and exterior stuff under this category. We made a
bunch of changes here, some of which I would not do again, and some
things we would add that we did not. Maybe we will build another
rig….anyone want to buy this one? Seriously - I'll make you a deal on a
custom rig with or without my truck that you could not buy a new one for
even close to.
o
We put on a BluDot brake actuation system,
since we have an air-brake truck. This is an air/hydraulic system
integrated with the truck airbrakes. It is the system used on
semi-trailers and is a true proportional system. The two units act as
ONE. This is not something that New Horizons has done in the past, so I
went up to the factory to train their technicians in the installation
process. I worked with them for a week on my rig on the BluDot and some
other electrical items.
o
An external camera looking down on the Jeep. I
provided the camera and they ran the wire to the hitch head. If I did
this again I would likely put two cameras on the back. One to look down
on the Jeep, and the second to look back down the road. It is convenient
to see vehicles that are close to the back of your RV. I would also
consider a right side camera.
o
Auxiliary 7-pin connectors on both sides of
the hitch at the rear. I should have had one wired as 6-pin. I changed
that myself. So I have a 6-pin connector as well as a 7-pin. This was
probably “overkill”. A 7-pin to 6-pin converter might have sufficed.
o
A separate wire bundle (7 wires) for auxiliary
functions goes from the hitch area at the rear, to the hitch head at the
front. It feeds into a 6-pin umbilical that goes to the truck. I had the
factory add the wire, but I terminated it myself and added the 6-pin
umbilical. It handles the brake feedback signal line to the truck that
tells me when the Jeep brakes are on, as well as passes video signals
from the camera(s) to the truck.
o
The optional rear hitch on the trailer was
supposed to be reinforced for towing a 5000 lb vehicle. When it came
time to do it I discovered that it did not need any
reinforcement – what New Horizons puts on is pretty stout.
-
Used a “home run” water
manifold system. Each line is run from the manifold to its
appropriate location. For any service work required you can isolate
a single appliance. This is now standard on all Majestic’s.
-
Dexter
8K disc brakes, 17.5” Goodyear H-rated G114 tires, 17’5” Alcoa
aluminum rims (and spare), and Mor/Ryde IS suspension make up the
running gear. The Mor/Ryde is standard on a Majestic. I could have
put on air suspension, but I like the Mor/Ryde IS better. I have had it
on three trailers now, and I think it is the finest suspension on
the market. The 17.5" wheels with H rated tires are now standard on
the larger rigs.
-
We went with the standard
2-stage dual furnaces (two furnaces are standard on the larger
rigs). We considered the hydronic heat/hot water package and decided
against it. First, it is very expensive. Second, it takes up
considerable storage space in the belly. And third, the new furnaces
are so quiet on “stage 1” that you can barely hear them. On stage 2
they sound like regular RV furnaces, but we have only had them go to
the higher output one time. And we have been in low teen weather
conditions. The hydronic system provides outstanding heating,
though. It is quiet and more “even” than standard RV furnaces. We
made a compromise in not getting it, but are satisfied with the
2-stage furnaces.
-
We also considered upgrading
the water heater to a 16 gallon unit, from the standard 12 gallons.
But we decided we had never had an issue with our 10 gallon heater
in the Royals
so we stayed with the standard unit. The way the 16 gallon water
heater works is to raise the temperature of the 12 gallons in
storage. On output (demand) it blends that hotter water with cold to
supply 16 gallons of hot water. It only stores 12 gallons - but of
super hot water. If we did it again I
would seriously consider the RV 500 from
http://www.precisiontemp.com/. This is a propane-fired instant
hot water heater designed for RVs. It fits in a standard hot water
heater space. The issue with the PrecisionTemp is that it does
require more maintenance than a standard heater, people have more
"issues" with them, and it costs considerably more.
-
Batteries: 6xTrojan T105
batteries. We had the compartment door made larger for easier access
(no charge for this). The larger door size is now standard. I
considered using L16 batteries for more capacity in the same
footprint. I would do that next time, but the price of the T105’s
was too good to pass up. I can easily fit in 6xL16 batteries in the
compartment. A Trimetric RV-2025 monitors the battery bank.
-
Auxiliary power:
-
Inverter is a Xantrex
RS3000 3000 watt pure sine wave inverter. This is no longer
available from Xantrex. I chose it for its 150 amp charge
section. This allows me to charge the battery bank at a high
rate for faster recharging on genset. If I was to order again, I
would put in a Magnum 2000 or 2800 watt inverter, since the RS3000 is no longer
available.
-
Solar Controller is a
Xantrex XW-SCC MPPT 60 amp controller. This networks with the
inverter for a single-system controlled by the SCP panel. I
installed this myself. New Horizons prewired with #4 welding
cable. If using a Magnum inverter I would use a
Morningstar MPPT 60-amp solar controller with its own remote
panel.
-
Instrumentation is via a
Xantrex System Control Panel (SCP) which unifies control and
monitoring of the the inverter and solar controller. I
supplement this with the Trimetric battery monitor. If using the
Magnum inverter in another rig I woudl specify the BMK (Battery
Monitor Kit) along with the Magnum. This would eliminate the
Trimetric and it shares the Magnum remote display so it
eliminates a display from the instrument area.
-
Solar panels will be
from Sun Electronics (http://www.sunelec.com), 800+ watts. These
will be 24-volt (nominal) panels. They have not been purchased
yet.
-
Generator is a 5500 watt
Onan LP genset. This will run our two air conditioners if required
and provide auxiliary battery charging. I considered both
gasoline and diesel gensets. In the end, it was easier to go
with the LP, since we simply do not use the genset much. If I
did it over again I would seriously consider adding a diesel
genset to my truck, which would have the added benefit of
providing AC on the truck without running the engine. I did not
tie the genset into the inverter system, although the Xantrex
SCP (System Control Panel) does have a
generator autostart capability. If I did add a genset to the
truck it would be an Onan QuietDiesel (or an equivalent RV unit). The APUs (auxiliary power
units) designed for trucks are too noisy and are harder to find
service outlets for. There is virtually no difference in cost,
even factoring in adding a min-split air conditioner for the
truck.
-
Note: I used the above
equipment for specific reasons. That is NOT what I would
recommend to others, and NOT what I would use if doing the same
thing now. Contact me for my personal choices, or for help with
your system.
-
The Majestic comes standard
with Quadra Bigfoot automatic biaxis
leveling system. We would never have a rig without it (our Royals
International also had Bigfoot). Quadra is our first choice for
autolevelers.
-
We had the
Winegard Trav’ler
HD model SK-3003 (DTV) auto dish installed and had all four output lines brought into
the entertainment center. Normally, you would only use two for a DVR,
but the extra two allow us to stack DVR’s, or serve as spare lines.
-
A
Wilson
Electronics model 301119 cell phone antenna was
installed on the roof over the coat closet area, with the antenna
cable run through the roof into the communications area previously
discussed. This connects to the amplifier and aircard/router and
is dedicated to supporting Internet connections across the cellular
data network.
-
Also on the roof in the same
area is a junction box for the solar line from the roof (#4 welding
cable). This terminates the solar pre-wire line. In the future I
would specify that the solar be terminated in a combiner box. They I
would have a separate junction box on the roof with a 1.5" conduit
going down into the top of the utility cabinet inside the front
door. This would permit easy cabling of rooftop communication gear.
-
The same junction box
contains the cat5 Ethernet cable that feeds the roof for my WiFi
capture CPE (Customer Premises Equipment) device. This allows me to
pick up WiFi signals that otherwise are not usable, move them to my
local router, and rebroadcast them on my local area network. Thus,
WiFi-enabled devices around the RV can avail themselves of Internet
that comes from RV Park WiFi, or from the cellular network without
knowing the source. For more on our communications setup look in the
Communications section of this
website.
-
We had the optional Scorpion
protective coating applied to the lower front of the rig (it is like
LineX) to protect it from stone chips. For me, this is a must-have.
-
A gas line with shutoff
valve was put into the center island. We will complete the plumbing
on this for use with a Blue Flame propane space heater (used when we
boondock only). A gas line with a quick connect was also put on the
outside near the step for hooking up propane appliances outside.
What We Missed on Our 2012 Coach
When you build a custom coach
there are always things you would do differently “next time”, or things
that you simply missed during the order process. The good thing about
New Horizons is that they will work with you to add these things over
time, if at all possible. The key is to get the structure and
infrastructure items correct – other things can be changed more easily.
-
We ordered the optional
central vacuum system. We find that it works great on the hard
floors (tile) but is not very good on the carpet. We prefer our
Eureka Optima Lightweight Upright vacuum with the Pet option for the
carpeted areas. This is the best RV vacuum we have owned – and we
have been through at least 7 vacuums in the ten years we have been
fulltimers. The central vac with its floor-kick pickup is great for
sweeping the floors with a broom. But I am not sure it is worth the
expense just for that.
-
We should have added a
kickplate electric outlet in the bathroom under the sink vanity next
to the heater vent. We use a small ceramic electric heater in the
bedroom year round. Not for heat, necessarily, but for “white noise”
at night. The single plug on the side of the vanity requires us to
unplug one device to use a hairdryer. An additional outlet dedicated
to the heater would be more convenient.
-
I
should have had a 12-volt outlet put near the seating area for
charging devices, and for use with a small inverter when boondocking
(for charging phones, computers, etc). Although this is not the most
efficient use of power, it is better than running the large inverter
just for charging small devices. Actually, in the next rig I will
add a dual inverter system –the large inverter for the entire house,
and a small inverter that feeds a single outlet strip just for
charging. The small inverter would have a remote control, like the
large one. I can (and will) add this myself, later. If you never
boondock, this is not an issue. Also, if you move to a residential
refrigerator this would not be a factor, since your large inverter
will be on all the time.
-
A side camera mounted on the
front right side of the RV (viewing down the side) would help with
blind-side backing, and vehicles in the blind spot. I should have
had this installed at the factory, since it would have been painted
to match the rig. It is easy for me to install myself – especially
since I have the extra wires run to the nose of the trailer – but
matching paint would be nice.
-
The TV lift opening should
have been specified for a larger TV. As it is, I can barely get a
40” on the lift. The lift itself can handle any size – the opening
is constrained to 40”. A 46" TV would be the ideal size for this RV.
-
Electrical outlets in the
side cabinets of the entertainment center. I have some in the top
cabinets where the various stereo/TV equipment is, but some
additional outlets in the sides would be convenient.
-
Custom end table with
drawers between the two recliners – this is easy to add later.
-
We replaced the cook top
with a Verona stainless commercial cook top. I should have
specified this to start with. My mistake. You can look at photos of
that installation
here. If I was doing it over, I would consider putting in the
black glass-top gas Verona. I think it would be easier to clean than the
stainless. But the stainless sure looks nice. I'd also consider
putting in two separate 2-burner modules side-by-side with a mixture
of gas and electric/induction. Take a look at the
Subzero-Wolf 15" module system. I'd mix the induction and gas
modules and inlay them into the countertop. This does require 240
volts for the induction, so it is only usable on 50-amp service.
Thus the gas module. Is this expensive? Yes. But you are building a
custom home.
-
I would have preferred a
BluRay home theater system. Samsung makes an integrated system
(integrated with the TV) but I did not specify this. The standard
integrated system I have is very good, but it is not BluRay. (Note:
the upgraded Denon system now drives the AV system, but you still
need to specify BlueRay.)
-
As I stated earlier – we
should have made the couch area deeper. I would build the entire
living area 1’ longer if I was doing it over. Six inches of that
would be in the couch area, and the rest in the entertainment
center.
-
Light
under the kitchen sink. It is a dark cavern. Now standard.
-
We would delete the lift-up
counter extension in the kitchen. We have not used it. With the
island there is lots of countertop. If I DID keep the extension I
would put it on the living room end of the island. We did consider
doing this at the time, but opted for it on the kitchen sink end of
the main counter.
-
Where the three drawers are,
to the right of the sink, I would remove them, and where the
lift-top counter extension is now I would add three enclosed shelves
on slides. Double doors would cover the area. This would provide far
more usable space. The three drawers are very narrow. The
alternative is to put the dishwasher drawer here, instead of where
the oven would be. This would allow 3 large drawers in place of the
oven.
-
Extend the tumbled marble
backsplash in the bathroom area along the cabinet side, instead of
just on the back wall. I'm doing this myself. It is now standard.
-
Add a second sewer storage
tube. I did this myself. Make the sewer connection door wider for
easier access.
-
Add a second fresh water
tank. We would do this for boondocking, but it is not necessary
otherwise. I think I would plumb this separately with a “switchover
valve” so you have to manually enable it into the system. The
standard water tank is now 100 gallons instead of our 75 gallons.
-
Add permanently mounted
whole house filter system. We started with two filters that we place
outside, which are convenient for filter element changes. I recently
moved them into the utility area myself.
-
The Hehr windows on this rig
are very good. I would have liked to have had the flush-mount
“frameless” bus-type windows that you see on Carriage and Doubletree
products (also made by Hehr). However, at the time there were still
too many issues with these windows. I now believe these windows are
sufficiently “debugged” that I would use them on the next rig, and
New Horizons will now put them in. They are now standard.
-
Elevate the entry cabinet
(coat closet) even with the first step to the bedroom. This provides
space to kick off your shoes and push them under. They are out of
the way if you have that space - otherwise they sit in front of the
cabinet and block the door some.
-
Build a separate water hose
storage area to the left (front) of the sewer compartment. There is
empty space between the skirt and the frame for this on larger rigs
(over 39'). Add a small storage area into the sewer compartment
for connecting tubes and elbows, and make the sewer door a little
bigger.
Delivery Process and Quality
All RVs have issues with them.
If you expect to get the “perfect” RV on delivery, you are going to be
disappointed no matter who the manufacturer is. From a consumers
perspective, the level of quality in RVs is notoriously bad if you look
at the entire industry. The thing that distinguishes one manufacturer
from another in the area of quality is 1) factory procedures that
minimize quality issues 2) good final quality checks at the factory 3)
Pre Delivery Inspections (PDI) that catch and correct issues before the
consumer takes delivery 4) Post-delivery corrections under warranty.
In the case of New Horizons and
other “factory direct” manufacturers (like Spacecraft, Hitchhiker, Travel
Units, etc)
there is no dealer network for PDI and post delivery warranty work.
Thus, the factory has to handle these items. From a manufacturing
perspective, custom manufacturers have
it even harder than pure production manufacturers. Every unit is
different so it is difficult to establish good procedures because there
is less repetition. Especially in small operations like New Horizons,
and Spacecraft. Building a high-quality custom rig without excessive
issues is a difficult problem. If you spend too much time on it, the
cost becomes prohibitive. If you spend too little time, the quality
suffers. Finding the correct balance is difficult. But as a consumer, I
really don’t care about their problems – I just want a rig that is built
correctly, and with materials that last – not with some of the junk that
the RV industry is notorious for using.
Fortunately, New Horizons has
been building quality custom RVs for some time. So they do have a good
bit of experience. And for the most part, they use higher quality
materials than other manufacturers. But, like any RV, there are issues.
The question is, what does the manufacturer offer for support, and what
is their customer service attitude? New Horizons will fix any issues or
oversights when you pick up the unit. - so allow enough time.
Delivery
You pick up your RV at the
factory. This is a BIG (and I mean HUGE) advantage, even though you must travel to Kansas
to do so. First, you get to see the factory and how your rig was built,
if you have not already done so. Second – and this is the important one
– you get factory service for any problems you find. No one is better
qualified to service your RV than the people that built it. You are not
likely to find a higher level of skill.
You will find issues that the
factory PDI did not find. Why is that? Well, you will live in the rig at
the factory, and there are things that are difficult to find until you
actually live in the rig. I recommend planning at least a full week for
pickup. The best plan is to arrive on Friday for your walkthrough, spend
the weekend in the rig examining it closely, and present your “punch
list” on Monday. This gives you an entire work week to work out any
issues, live in the rig, and become very familiar with things. It also
gives you enough time to change minor things that you might not like or that
you missed. Things like shelves can be easily changed if you have enough
time. The very WORST thing you can do is to arrive at the factory for
pickup and not leave enough time for proper orientation and fixes. There
WILL be issues, and if you expect to leave in a hurry you will be
frustrated, and not able to take advantage of service at the factory. So
plan accordingly. New Horizons wants you to be totally satisfied with
your rig when you leave. And if you schedule enough time you will be.
Quality
Our 2010 was unit #8 in the Majestic
line. This product line was built with many new design elements and
parts from what the Summit line was. For example, the slides are totally
different in the way they operate. The frame is new. The end caps and belly layout is
different, etc. There are “growing pains” when producing any new line,
and we knew that going into it. That said, our initial quality punch
list was pretty small. Other than mistakes made by suppliers, we only
had 11 items on the punch list. And most of those were minor.
After living in the rig for
eight months we had a longer list – which I expected to be the case.
Again, most were minor, but there were a couple of major items.
-
First, some of the slide seals were
not quite right. Some of them needed replacing with larger ones. Not really
surprising since the slides were a new design. We had air leakage
around some of the seals, and some people had more serious water
issues with these initial seals. The seals have all been changed to
a better design, and for 2012 there is now an even better design.
-
We had three window leaks. The
windows needed to be reset. That was an issue that should not have
occurred. There was a production issue that has been corrected.
-
We had an issue with the
rear cap not being sealed properly around the end-wall. An easy fix,
but it should not have occurred.
-
A loose floor tile (peeling
up) in the toilet room needed to be re-glued. A minor issue.
-
A loose tile UNDER the
kitchen slide catches sometimes when the slide is pulled in. Since
that initial loose tile we have had 3 others under the slide
replaced.
-
A piece of trim molding not
aligned properly that I missed on the initial pickup.
-
The kitchen counter puck
lights failed – I thought the switch was bad, since they both died
at once. Since we were headed for the factory I did not investigate.
Embarrassingly (for me) the bulbs were burned out. There must have
been a 12-volt surge.
-
The polyurethane on the
bottom bedroom step hazed over and needed correction. Turns out that
it was never poly'ed.
-
Bad pantry slide - it
sometimes jams. This showed up after use. And it comes and goes....It
turned out to be a slightly bent rail - an easy fix.
As of 2012:
-
We have a small leak in the
window over the entertainment center. If only happens occasionally.
It needs to be pulled and resealed. Either I'll do it, or the
factory will in March.
-
We have a small leak in the
hydraulic manifold that controls the slides. This is in a plug for
an unused port. I've torqued it as much as I'm willing too. The
factory will fix it in March.
-
The slide seal over the main
slice has come off its mount. This will be fixed by replacing with
the newer slide seals. I put it back on, but it really needs
replacing to fix it right.
Quality will continue to improve
as the product line “matures”. But on average it is was pretty good as it
was, in my
opinion.
The true mark of a manufacturer
is in how they handle mistakes. Every manufacturer makes mistakes –
hopefully not on MY unit. But mistakes do occur. We have friends that
have a New Horizons Majestic (the unit after ours) where some mistakes were made in production.
Way more than should have been. New
Horizons absolutely stands behind their product, and there were no
issues or questions about correcting things.
Two years down the road
from when our rig was built many things have changed at the factory. As
you would expect. Quality coming off the line is now what I consider
very good. And new in-house quality inspection procedures before
customer delivery have proven to be very good at catching most remaining
issues. But no matter how well quality control is performed it is
unrealistic to expect a "perfect" rig on delivery. There will be things
that you find - after all, the factory people do not actually live in
the rig. In my opinion delivery quality can always be improved, and that
is one area New Horizons works on constantly. For quality comments on
our 2012 coach see the "Our 2012 New
Horizons" section below.
Service
We often get the question of
“how do you get your rig serviced if there are no dealers”? The answer
is twofold.
First, you can get an issue
addressed by any certified RV technician at any dealership (or an
independent mobile tech, as long as they are certified). New Horizons will pay
the service provider directly, so there is no payment issue. New
Horizons only asks that your provider work through them, so they can
advise them on any model-specific things required.
Second, and best, is to return
to the factory for servicing. We much prefer coming to the factory,
since obviously that is where the specific expertise on the rig is. But
for routine servicing any technician can do it.
Towing
You can see that we tow with an
HDT (Heavy Duty Truck). You can read about HDTs elsewhere on this site.
We feel it is the best choice for towing a heavy load, but there are
other options. My suggestion is to not dismiss an HDT as your tow
vehicle until you have all the facts.
There is a video on "Tow Vehicle Considerations"
that I did
HERE.
A New Horizons in the 39'+
category is going to be heavy. A heavy frame, all wood cabinets and
quality residential appointments all add up. Light RVs are almost always
"cheap" RVs. There is no getting over the fact that a quality rig, with
residential appointments, is going to be heavy. You need a capable tow
vehicle. Our 42' New Horizons weighed 19,080 lbs EMPTY from the factory
(and that was without furniture). Loaded with our "stuff" it
was 22,820
lbs with 5700 lbs of that being pin weight. The GVWR on our trailer is 26,000 lbs.
You are not pulling this with a pickup - at least not safely. You
"could" pull our 2010 with an F450/550, but it would be maxed out.
Our weights for both the 2010
and 2012 coach are in
this spreadsheet. I
have the unloaded weight ("naked" from the factory), as well as our fully loaded (full of
"stuff") weights documented.
You choices boil down to:
1) Upgraded pickups in the
F450/F550 category. This includes the Chevy 5500-class trucks, but the
5500-type trucks
are not rated high enough for most larger New Horizons, and they are
no longer made. A 2011 or
2012 F450 is rated up to 33K lbs GCVW so it will pull most New Horizons.
An F450 outfitted for fulltime use is going to weigh in the
9800-10,100 lb area, loaded to go. We know, because we used to have
one. That would leave you no more than 23,000lbs for the trailer. In my opinion, pulling much
over 21-22K lbs with even the newer and more capable F450 is marginal, at best, and is NOT RECOMMENDED. Although it is certainly
within the trucks specifications. It is your decision. New
Horizons can arrange a purchase of an F450 that is nicely equipped.
In fact, they often have one of their pullers for sale. You "could"
pull our trailer with a properly outfitted F450, but it would be
near its max rating. You also need to be concerned with the GAWR of
the rear axle with larger New Horizons. The pin weight may require
you to go to an F550 for the more capable rear axle.
The 2013
Dodge 3500 series can be configured to have a 37,000 lb GCWR. This
should make a capable tow vehicle for heavier New Horizons.
2) A "true" MDT like a
Freightliner M2. These typically have engines in the 300-350 hp
range and up to 1000 lb/ft of torque. They have excellent brakes.
They make a capable tow vehicle, but are slow on hills because of
the low power. In many cases an F450 will pull as well - they just
won't stop a load as well. The virtue of the MDT is that it is
closer to a "pickup" in its looks and interior than an HDT. Most
have 4 doors, and windows like a pickup. If interested in a new or
used truck
like this I strongly recommend that you discuss it with Wayland
Long, the owner of
2L
Custom Trucks in Poolville, TX.
3) An HDT. This is the most
capable tow vehicle, with lots of pulling and stopping power. Most
are
taller at the floor than an MDT by about 11", so you have to "climb" into it more
than the other trucks. Good grab rails and steps help a lot. In most
cases it is actually easier to get into an HDT than an MDT. The
biggest advantage of an HDT for many people is the ability to haul
all the weight you want - including cars - on the deck. And the deck
can be as large as you need. You can also outfit an HDT for extended
travel as a motorhome, with refrigerator, bunks, cooking facilities,
shore power, etc. A "mini-RV". Note that there are
Freightliner M2s that are
really HDTs....an M2-112 is actually a heavy duty truck, with up to
500+hp and 1800 lb/ft of torque. A very good alternative to an HDT
with a sleeper if you want the 4-doors and windows. If you are
looking for an HDT to haul with take a look at what Gregg Shields,
from RV Haulers
has in stock.
There are other considerations
that factor into towing, in addition to weight. One of them is overall
height. The Majestic is tall. Depending on the air conditioning unit
used, and the model/age of coach, a Majestic can be up to 13' 5". It may
even be taller if your truck is not hooking the coach up level. Here is
some actual data:
-
My 2010 coach was 13' 4.5"
at the front AC unit. That was with a Carrier low profile AC unit
that is no longer available.
-
With the Coleman low profile
units my 2012 coach was 13' 5" when the coach was level, off the
truck. On the truck it was 13'6.5".
-
We later put on a newer
Coleman Ultra low profile MACH 8 air conditioner. This brought the
coach to 13' 2" when leveled off the truck, and 13' 3" on the truck.
A very good solution. The MACH 8 is now standard on Majestic's in
the bedroom/bath area.
-
The Majestic hitch plate is
48" from the ground when the hitch is in the middle set of holes,
with the coach leveled. Make sure you have the clearance required to
your truck body with a hitch set like this. If you "recess" the
hitch to its upper set of holes then the hitch plate will be 50" off
the ground. Lowering the hitch head places it at 46" off the ground.
-
Note that recessing the
hitch all the way lowers the front skirt of the coach very low to
the ground unless you maintain level. So don't be tempted to lower
the overall height of the coach by simply dropping the front. The
Majestic has adequate ground clearance in the center hole set when
leveled, but the more you (effectively) lower the skirts by
recessing the hitch the more you risk hitting in the front - you
need to maintain a level coach, so the hitch in the truck has to be
the appropriate height to do so. Maintaining ground clearance at the
front skirt of the coach is especially an issue with HDTs or MDTs
where the hitch may be behind the center line of the axle. Having
the hitch behind the axle amplifies the movement of the trailer
front towards the ground when traversing dips.
One of the issues with using an
F450 as a tow vehicle is body side clearance. The side rails on an F450
- and most pickup-style trucks - are pretty high. You can end up with
only 5" or less clearance between the truck and trailer. I strongly
advise that you measure carefully. Or better yet, if towing with an F450
specify a hauler body on it. I personally like the
Utility
Bodywerks beds. It gives you lots of storage, lots of clearance, and
looks great.
Our 2012 New Horizons
Pictures of the 2012 being built are
here. Pictures of the finished unit are
here (exterior) and
here (interior and some exterior details)
Many people have asked about
what we have changed in the 2012 rig. Many have asked why we
built another coach, as well.
First - the only reason
we built another coach is because we show the RV, on behalf of New
Horizons, to prospective customers. We show this coach a lot. We attend
Rallies with it, and show it in RV parks around the country. As such, it
is beneficial to New Horizons, prospective customers, and (obviously) to
us that
we have a fairly current RV to show. Who wants to see an RV without the
most "current" features?
This section will list some of
the things that are different in our 2012 RV over the 2010. It focuses
on non-standard features. You can assume that all of the changes noted
in the 2012 features are in this unit. Look at that section, above - I'm
not going to repeat it here.
Basically, the floor plan is the
same. We prefer the side entertainment center for a number of reasons.
Foremost because the TV is directly in front of our recliners, at the
right height, and you do not have to twist sideways or look "up". This
is the primary motivation for the living room floor plan we chose. The
only change in the basic floor plan over the drawings shown for the 2010
unit is that we
extended the overall length six inches. We added three inches to the
sofa area, which gives a 41" usable depth for a sofa, and we added three
inches of width to the
refrigerator "box" which allows for a residential counter depth
refrigerator (39" box, outside, wall-to-wall). We also put in a 30" wide
entry door, which caused the slide to shift. The three inches in the
refrigerator "box" is reflected in the curb slide and allows that to
remain the same size as in the 2010 RV. If we had not added three inches the wider door would
have taken away from the slide length. There has to be enough outside
wall space to mount the handrail and awning arm, and more importantly,
there has to be enough width for the slide room framing. Adding a wider
door complicates layout. There are even wider doors available, but
the 30" door is sufficient. Putting in a 32" or 36" door requires
an even longer unit. The issue is the location of the axles. They have
to be positioned to achieve a 20% (or so) pin weight. And they can not
be under the door.
The following - in no particular
order - are things we changed over the 2010:
-
Shaw hand-scraped hickory
engineered wood floor everywhere except bedroom carpet area, and
curb slide carpet area. I was told by some that we will regret this
because it shows dust and dirt easier. To me, that just makes it
easier to clean up....but we will see. We have an area rug in the
living area. After living with it for several months we really like
the wood floors - they are so much easier to keep nice. Our next
unit will have them too.
-
Residential refrigerator. We
chose a counter depth Frigidaire Gallery Series
FGTC2349KS, 23 cf with water and ice in door. This is a
side-by-side and it uses 550 kWh of power a year. We originally set
out for a bottom freezer with French doors above, but this unit gave
us slightly more space in the same footprint, and does not look as
large. A good alternative is
the
GE Profile PFIC1NFZ 21 cf. It uses 571 kWh a year. Both of these
units are counter depth and are panel-kit ready. The panel kit was a
major consideration. In our chosen floor plan we have the
refrigerator (visually) somewhat in front of one of the recliners. Having a panel kit
integrates it better into the cabinetry - you do not want to be
staring at stainless steel (as an example).
-
Battery bank is four 8D
Lifeline AGMs for a total of 1020 Ah of battery storage. Usable is
510 Ah.
-
Magnum 2800 pure sine wave
inverter with 125A charge section and integrated battery monitor (BMK),
along with the remote display. The Magnum is great - the BMK, not so
much. I've installed many of the BMKs and configured them, but this
is the first I have personally owned. I have to say, I like the
TriMetric a lot more than the BMK.
-
Morningstar Tristar MPPT 60
solar controller with remote display. Both the solar controller and
inverter/charger are temperature compensated, and the Morningstar
also has a voltage sense line and an Ethernet line connecting it to
my router for PC monitoring of the solar array performance (although
to date I have not set configured this remote monitoring to the PC).
-
MidNite Solar "baby" breaker
box is used with the solar controller to isolate it when required.
-
AM Solar combiner box on the
roof.
-
Sun SV-T-205 HV solar panels. These are 205 watts, 27.90 Vmp,
7.36 Imp, high voltage poly-crystalline panels. Four of them give me 820 watts of power. In practice it will be less than that,
since they are mounted flat, without a tilt capability. This
maxes out the controller. Installed by New Horizons. Note: these
panels are large and are slightly shaded by the front AC unit in
some parking directions. So that has to be accommodated for when
parking the rig boondocking. The tradeoff is to have less panel
capacity. I'd rather "manage" the orientation of the rig.
-
We moved the 5500 watt
LP genset from the 2010 coach.
-
Ceiling lighting is all LED.
This is dimmable via the multiplex light controls.
-
Lazy Boy furniture. We
started with two
Larson recliners and one Larson love seat (like two recliners together)
that is a rocker/recliner. The Larson recliners turned out to be a
mistake. The Larson furniture is rather large - we replaced it
with leather euro-style recliners that fit us well, yet appear
smaller in the room. I also do not need a footstool, since my new
recliner is large enough. The Lazy Boy Pinnacle style is the right
size, and what we had in the 2010. The Larson loveseat works fine in
the bay window area.
-
The entertainment center
cabinetry is
almost identical, and adding the 6" to the overall unit allowed us
to keep it the same size. The only difference is that the top/left
file cabinet is now two drawers instead of a file cabinet. The other
three file cabinets that flank the fireplace remain.
-
The TV is upgraded to a
Samsung LED 40". The standard TV is an LCD 40". I also had the lift
door sized for a 50" TV so I can upgrade later if
"allowed".
-
The surround sound system
was upgraded to a Denon A/V receiver with Boston Acoustic
speakers - we are experimenting on this unit with a new set
of components and speakers that may replace the current Samsung's
used as standard. (The Denon has since become the standard AV
receiver.) Blu-ray DVD. The Boston Acoustic speakers are quite good,
but the center channel could be improved.
-
Each of the overhead
compartments in the entertainment center has shelves and an
outlet.
-
Grey water flush.
-
Larger sewage storage door,
with area for storage of components. Two hose storage tubes instead
of one, sewer macerator.
-
Extra outside electrical outlet near
propane tanks, for plugging the truck into (120v/20A).
-
Reverse osmosis water with 3
gallons of storage under kitchen sink. This supplies the
refrigerator, and the countertop water dispenser. It also has a DC
line there for a future auxiliary DC pump if required to supply
higher pressure water for the RO unit. RO units work best on more
than 40 psi. This has proven to be a great addition - much better
water than just filtered. We would definitely do this again.
-
Cook top is the (now)
standard black Verona 4-burner unit on top of the counter. Done
over, I would change this to the glass top gas unit, also Verona. It
is easy to clean (far better than stainless) but the glass would be
even better. Take a look at the 30" GE Profile gas/glass cooktop. It
is a nice unit, but the larger size is a consideration unless you
stretch the kitchen in that area.
-
Storage under the Verona is
two doors (French opening) with a shelf. Standard is two drawers.
The shelf makes better use of the space and allows for more flexible space
usage.
-
Dishwasher is in the new
standard location, with one drawer above it.
-
Wine rack is replaced with
a small cabinet with door.
-
Center island trash storage
is converted to a shelf. Upper drawers are reworked to one large
drawer (two small ones combined), and one additional small drawer
next to the large one. This "new" drawer uses the space above the
trash can area. Drawers open towards the street-side. Trash can is under sink.
-
Sink is a Swanstone
Ascend undermount quartz sink in Espresso (dark brown). If you
have a dishwasher you might consider a smaller (25") sink.
-
We used the same oiled
bronze Delta High Rise faucet, model 19949-DST as the 2010 - mounted without the plate, and with the soap
dispenser.
-
Lighting in the kitchen has
been modified. Starting with our unit the new lighting will
incorporate standard pendant lights over the island, and an extra 12-volt "puck" light in the ceiling
over the kitchen area. The 120v "bright as day" fluorescent fixture
will be eliminated in coaches with an island. An example of the pendant lights is in the New
Stuff, below. The pendants mount on a cherry medallion on the
ceiling.
-
Our vanity area is quite a
bit different. It is as shown below in the vanity picture (New
Stuff). It is the second picture with the extended medicine cabinet
and the full width counter. We eliminated the closet we had in this
location. We still have three drawers below (we had 5), but I lost
all "my" shelf space above. In reality I have plenty of space
elsewhere.
-
We pushed the cabinet back
2" in the toilet room. It gives a little more space in front of the
toilet, and allows the toilet room door to be widened 2".
-
We added 9"deep shelves to
the left side of the wardrobe. I store stuff here that I don't
wear often....I consider it "long term" storage.
-
The entry closet is raised
6" for shoe storage - otherwise known as a "shoe garage".
You can not do this if you choose the whole-house vacuum option
which needs to be placed in the base of the entry cabinet.
-
The instrument center is
moved to the upper cabinet. The lower cabinet is already raised the
6" for the shoe storage, and we made it slightly smaller than the
upper. Thus the instruments are not really that much higher. This is
standard now.
-
We have a rough in for a
third AC unit that would take the place of the MaxAir fan in the
living room. This is ducted, wired, and thermostat wire run. All
"prepped" for the AC, should we ever desire it.
-
There is a 1.5" conduit
through the roof into the utility closet at the front door, then
down into the main compartment. On the roof it terminates in a
utility box. I use it to route electronic
gear cabling to the roof.
-
Porch light is replaced by a
"scare light", and centered over front door. Now standard.
-
Steps are three steps
instead of four. These are upgraded aluminum steps that are powder
coated, with deeper treads. We use a portable step for the bottom
step. This allows us to adapt for uneven ground, and/or a deck.
These aluminum steps are quite nice - but the tread depth is
shallow, and that is a compromise. Consider carefully if that would
work for you. I like the maintenance-free steps...but I might
reconsider next time and put in the three-step version of the steps
with deeper treads.
-
We added a right-side camera
to the RV. It will help significantly during blind-side backing.
-
We added cherry baseboard
throughout the coach (2013 feature) and a chair rail in the living
room.
Our 2012 New Horizons
Quality
Many people know that I am
critical of the RV industry for the quality of the units
produced, and the components utilized. Some think I am being unfair, but
my perspective is that if a manufacturer is producing a "big ticket"
item it should be well constructed and utilize quality components.
Especially in higher-priced units intended for fulltiming.
Unfortunately, in general, the RV industry still produces what I
consider to be "marginal" products. Fit and finish, and the basic
building materials used, are often nowhere near reasonable standards for
the price charged. It is also true that carrying capacities and the
running gear used is marginal, resulting in breakdowns and serious
damage in many cases.
New Horizons attempts to use
quality components and to assemble their custom units well above the
typical RV industry "standards". Our 2010 (unit #8) was pretty good, and things
improved radically after our unit - as you might expect from a
company that prides itself on "continuous improvement". There were so
many nice touches and improved components added to the product line in
two years that we felt it was worth the upgrade to our 2012. So how did
New Horizons do, quality wise, with the 2012? Well, amazingly well
- they actually exceeded our expectations.
I have to say, that I am very
impressed with the "final finish" section of the production line. The
newer employees bring skills and an attitude to production that were
lacking in the past, and make a HUGE difference in the final product.
This is continuous improvement at its best, in my opinion. Our 2010 unit
was very well done - but the 2012 is a level above that. The fit and
finish in this coach is well above anything else I've seen in the
(towable) RV industry. And in my opinion it is because not only does production
management "care" about it, but the line employees are highly skilled
and take pride in their work. They WANT to satisfy customers, and they
do. Now, this is not to say that mistakes do not get made - they do, and
will, in any production environment - especially on totally custom RV's.
But these are minimal, and they work diligently to improve the process.
My list of issues was very small, and I'm a pretty demanding customer.
So, what were our issues with
the 2012? You can see what we presented to the factory on pickup -
but note that most of this "punch list" is really things we asked to be
changed or added - not really problems. But it should give you an idea
of what happens on pickup, and why we recommend that you allocate a
minimum of a full working week to pick up your new unit.
I have not edited or changed this list - it is exactly what I presented
to the factory.
Punch list.
The "Next" Coach -
What I Would Change
Change is continuous. We always
find things that can be improved, or that we would change because our
needs change, or additional products come to the market. I'm going to
use this section to record our thoughts on our "next" coach. Will there
be a "next one" soon? Well, as long as we have the relationship that we
currently have with New Horizons the answer is likely "yes". In fact, I
anticipate selling the 2012 coach we are currently in sometime in 2013/early 2014 and shifting to a
new coach. One thing we will do differently - we
will NOT build a new coach until this one is sold first.
So if you are
interested, we can arrange the "opportunity" to buy a very customized
and up-fitted coach at a very good price - way below actual retail
selling price.
In no particular order, these
are our ongoing thoughts. They may change over time, so take this list
with a "grain of salt".
-
The 2012 coach is 42' 6" -
the next coach will be 43', or 44'. We will
add an additional 6" into the main slide and entertainment center.
This will enable the chairs to slide "down" a little for better
positioning. They are fine as they are now, but the additional 6" in
the entertainment center will allow for a 55" TV and the chair
positioning is a side-benefit. We may also add 6" into the kitchen
area so we can use a 30" residential glass/glass cooktop. Right now
I like the GE Profile line.
-
I'd like to work a layout
where the refrigerator is in front of the entry door and the pantry
is next to the stove. That may require a longer unit. We will see.
In the end, I may not like this but at the moment it is the
direction we are heading. The only motivation for this is appearance
- we think it will be better to have the pantry where the
refrigerator is now.
-
We think we have the upper
deck (bed/bath) perfect for us, given the current options. But for
resale we may change the toilet room from a closet replacing the
sink, to the standard sink with a larger cabinet above it. Many people like
the sink in there....for us, we would rather have the closet
storage. But we may be able to accommodate both.
-
I'd like to see a shower
that used a preformed pan and then the walls are Corian/Silestone/artificial
marble, with tile inlays. I think this makes for a nicer shower more
in line with the rest of the residential look of the coach. I'll
probably do this in the next unit if it does not become an option or
standard. It will add cost to the coach because of the time required
to install it, and the additional material costs.
-
For sure we will have a gas
cook top with a glass top. We may put in two modules, one electric,
one gas. And it may be the 30" GE Profile referenced above.
-
Side by side residential
refrigerator will go back in. Probably a newer model than we have,
but the same concept. The residential refrigerator has worked out
well even boondocking. In my opinion all coaches should now be using
a residential refrigerator.
-
We will do a "motorhome
style" dining table layout. This has shallow cabinets along the
wall, with a table cantilevered from it, instead of the current
freestanding table. We might even create a side-by-side eating area
where we sit looking out the window. For resale this would be easily
modified to the cantilevered table layout. We may add this
to our 2012.
-
Electrical would be much as
we have in the 2012. I'd substitute the Trimetric battery monitor
for the BMK. I'll likely do that in the 2012. I'd put a "front" plug
for the 50 amp service cord for those locations where the rear cord
can not reach. I'd seriously consider a power cord reel that allows
for more than the current 32' of cord. I'd replace the few
remaining halogen lights with LED, but this will be standard on 2013
so should be unnecessary. I'd also be more careful of specifying
which circuits are on the inverter - I'm discussing reworking the
standard layout with New Horizons now. But there are user training
issues with putting all outlets on the inverter. (Note: NH has
changed the standard inverter circuit layout. I'm satisfied with the
changes, and I have them retrofitted to the 2012.)
-
Water: I'd consider putting an
extra 100 gallon tank on. I'd use this for spare water and/or for RO
water storage. Our RO system is great, but we are working off a 3 gallon
tank for drinking water only. I'd seriously consider running off
internal RO water for everything, not just drinking water. I highly
recommend the RO system, even if it is just for drinking. I'd also
add the electric water hose reel with 5/8" hose on it. With the new
utility layout (for 2013) this would work well.
-
I would like a single main plenum
AC system. Right now the system is split - bedroom/living room. A
common main plenum is a better design. There are layout problems in
the roof that cause issues doing this - mainly the fact that the
skylight in the bath prevents return air ducting layout. This is
likely to be an upgrade before our next rig, but if not, I'll
sacrifice the skylight to get it. I'll add a "light tube" in the
bath area for natural light. We do not need the additional head
clearance the skylight provides in the shower.
-
Upgrade to the 16 gallon hot
water heater. We have enough hot water with the 12 gallon system, but the 16
would be better. I'm tempted by the continuous hot water systems,
but I still hear of too many issues with pressure vs. volume with them.
That likely will change in two years time, though.
-
Electric under floor heat in
specific areas. Namely the main bath "hallway", the living room
space between the fireplace and chairs, and just in front of the
landing/entry door area. The Shaw wood flooring is designed to
accommodate this. These will all have separate thermostats.
-
The lambrequins need to be
shallower. They are over 4" deep in our 2012 unit and they interfere
with furniture. They have been reduced in depth 1" in the newer
units. I may go to soft lambrequins in the main slide. Most
people would not think this to be much of an issue. But it really
does interfere with the furniture. A minor point, perhaps, but why
not improve it? (We had this change made in the 2012, and it is now
standard.)
-
Custom built end tables with
storage flanking the couch area. A smaller version of what we have
between the current chairs. I just have to convince New Horizons
that they "want" to build them.
-
We will have granite in
the next coach (see the 2013 features section), but I will change the tile backsplashes to a custom
tile that we pick. I may substitute quartz for the granite on the
just the kitchen counters - granite elsewhere.
-
A storage compartment behind
the dining slide at the rear of the coach. This is currently wasted
space.
-
Maybe an infrared panel heater on
the wall in the bath, between the toilet room door and the
washer/dryer doors. This will be wired to the main panel, not the
inverter panel. In addition, the lower electric outlet in the bath
vanity will be on its own circuit on the main panel. We use this for
an electric heater.
New Stuff
Things constantly change in the standard
appointments, and the way things are done. New Horizons strives to
constantly improve the quality and engineering in their rigs. I'll
include "some" of the changes in this section. I'll also include some of
the interesting modifications people make that I can get pictures of.
These changes started with the 2010 coaches, and are a running
commentary - many of these elements have been incorporated into the
standard product, or are options.
Most of the pictures below are thumbnails.
Click to expand. They open in their own windows so you can put them
side-by-side to compare them.
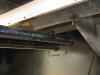
One of the things we disliked in our 2010 coach was the way
the electric wires were retained under the slides. The new method
encloses the wiring in tubes. This completely protects them and makes
the entire under-slide area much neater. The tube moves in/out with the
slide. The photo shows a hole blown through the frame - this was the
prototype installation. These holes are
now reinforced with a welded plate like you see with the slide arm. The
reinforcing plate has a neater hole in it.

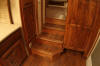 The
"new" stairs (starting in 2011) have deeper tread depths. It makes navigating up and down
to the bed/bath much easier. The first picture shows the standard vinyl
tiles that we have in our 2010 coach. The second picture shows stairs built
with custom distressed Hickory flooring. In this coach the flooring covers
all the main living area and the bath area. Also, look at how the coat
closet is elevated above the floor, leaving an area to put your shoes if
you remove them when coming in. That was our suggestion, and we
incorporated it into our 2012 coach. It keeps the shoes "mostly" our of the
way. The
"new" stairs (starting in 2011) have deeper tread depths. It makes navigating up and down
to the bed/bath much easier. The first picture shows the standard vinyl
tiles that we have in our 2010 coach. The second picture shows stairs built
with custom distressed Hickory flooring. In this coach the flooring covers
all the main living area and the bath area. Also, look at how the coat
closet is elevated above the floor, leaving an area to put your shoes if
you remove them when coming in. That was our suggestion, and we
incorporated it into our 2012 coach. It keeps the shoes "mostly" our of the
way.
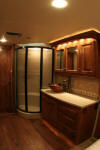 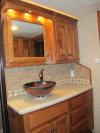 On
the far left
is the "normal" vanity treatment for a larger bedroom unit. Our
2010 coach would have looked like this if we had not added the cabinet
next to the vanity. We lost the large drawers and upper medicine
cabinet area. There is a lot of vanity top here and it is very nice. Note the wood floor continuing in the
bath area. On
the far left
is the "normal" vanity treatment for a larger bedroom unit. Our
2010 coach would have looked like this if we had not added the cabinet
next to the vanity. We lost the large drawers and upper medicine
cabinet area. There is a lot of vanity top here and it is very nice. Note the wood floor continuing in the
bath area.
On the near left is a modification of the standard vanity area we like a
lot. The right-side medicine cabinet area is basically doubled in depth
and the lights shortened accordingly. This looks pleasing and gives you
more storage without building a large cabinet like we have. You retain
use of the countertop which we sacrificed. In this case there are pocket
doors separating the bath from the bedroom area, but you could have it
open to the bedroom if you did not want the pocket doors there. This
will be a 2013 standard feature.
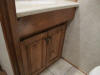
While we are on the topic of bath vanities - here
is a customization of the small vanity in the toilet room. Note that the
lower area is recessed in, to allow additional "knee room" on the toilet
(which you can just see in t the lower right portion of the picture. In
this instance, the toilet paper holder is also inside on the door of the
cabinet.
 New
outside "scare" lights. Note they are painted to match the body color.
These oval ones look nicer than our round ones. I would specify this for
the porch light - they look nicer and put out far more light - and I
would place it in the center over the door opening instead of off to the
side. That way it lights the step area from above better. New
outside "scare" lights. Note they are painted to match the body color.
These oval ones look nicer than our round ones. I would specify this for
the porch light - they look nicer and put out far more light - and I
would place it in the center over the door opening instead of off to the
side. That way it lights the step area from above better.
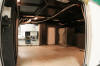 This
is the main storage compartment of a 45' unit. There is really a
lot of space here. It is 44" tall. There are two doors to access this
space on the passenger side of the rig. This
is the main storage compartment of a 45' unit. There is really a
lot of space here. It is 44" tall. There are two doors to access this
space on the passenger side of the rig.
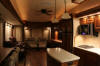 This
is the same unit shown in the (left) "bath" shot above. It is 45' long. There
are pendant lamps over the center island. These work well, and have
proven to be no issue during travel. They do move some, but nothing
"bad" has happened to them. These are now standard. Also
note the Verona cooktop. You can see ours and how we added it in our
Verona Picasa Album. This
is the same unit shown in the (left) "bath" shot above. It is 45' long. There
are pendant lamps over the center island. These work well, and have
proven to be no issue during travel. They do move some, but nothing
"bad" has happened to them. These are now standard. Also
note the Verona cooktop. You can see ours and how we added it in our
Verona Picasa Album.

This unit has two 2-burner cooktop modules that I
discussed earlier. The left one is a 2-burner induction cooktop. The
right one is a 2-burner gas cooktop. In this case they are both from
Verona in black. You would only be able to effectively use the induction
module on 50 amp electric service. In our case, we are usually on 50 amp
service, so it is something to consider. You can also place these
modules touching each other with a trim strip.
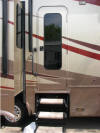 This
door looks great. It is a frameless window design, like the
optional frameless windows. The entire glass area pops out from the
bottom, just like a pop-out window. Like a window, there is a screen
inside, directly behind the window glass. There are several things I
don't like about this door. First, there is no other screen door, so you
can not leave the door open. Second, if the window is open and the door
is then opened all the way, the window will hit the side wall of the RV.
It will either break the glass over time, or damage the paint. Third,
there is not interior shade on this door, so at night you can see
inside. Consider carefully if this is the door you want - it is an
option. It sure looks nice, though. This
door looks great. It is a frameless window design, like the
optional frameless windows. The entire glass area pops out from the
bottom, just like a pop-out window. Like a window, there is a screen
inside, directly behind the window glass. There are several things I
don't like about this door. First, there is no other screen door, so you
can not leave the door open. Second, if the window is open and the door
is then opened all the way, the window will hit the side wall of the RV.
It will either break the glass over time, or damage the paint. Third,
there is not interior shade on this door, so at night you can see
inside. Consider carefully if this is the door you want - it is an
option. It sure looks nice, though.
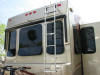 This
shows the new "frameless" windows now available on the Majestic. They
are the same Hehr windows that are used on DRV, Carriage, Spacecraft and
other units. They look wonderful and work well. On this unit there are
fixed (non-opening) frameless windows in most of the slide ends. You do
not want a pop-out window open if you retract the slides.
One thing I do not care for on the picture shown is that the windows are
"shorter" than the standard Hehr windows on a Majestic. Normally, the
windows come almost to the "shelf" of the endcap. It makes a big
difference inside - especially in the main slide. (Not so much in the
endcap, where the sofa blocks the windows some anyway.) I would want
taller frameless windows, but that requires a tooling fee for the
special size. Once someone springs for that, the taller windows will be
available. New: the taller
frameless windows are now a reality, and are standard. They are a longer
version than shown here. The framed window is a a no-charge option. This
shows the new "frameless" windows now available on the Majestic. They
are the same Hehr windows that are used on DRV, Carriage, Spacecraft and
other units. They look wonderful and work well. On this unit there are
fixed (non-opening) frameless windows in most of the slide ends. You do
not want a pop-out window open if you retract the slides.
One thing I do not care for on the picture shown is that the windows are
"shorter" than the standard Hehr windows on a Majestic. Normally, the
windows come almost to the "shelf" of the endcap. It makes a big
difference inside - especially in the main slide. (Not so much in the
endcap, where the sofa blocks the windows some anyway.) I would want
taller frameless windows, but that requires a tooling fee for the
special size. Once someone springs for that, the taller windows will be
available. New: the taller
frameless windows are now a reality, and are standard. They are a longer
version than shown here. The framed window is a a no-charge option.
 This
is a dishwasher drawer in the end of the counter to the right of the
sink. In my opinion it is the best place for a dishwasher. Ours is under
the cooktop where the oven would be, but this is a far better location.
It is closer to the sink, and uses an area that is not otherwise
optimally used. There is space for a drawer above the
dishwasher, although in this particular installation there are no
drawers. If you place the dishwasher here, there is room for two or three very
large drawers under the cooktop where the oven would be, or, you could
have an oven. In our case, instead of drawers under the cooktop we would
have two doors (opening to the sides) with an adjustable shelve in the
cabinet. This would maximize usable space - you lose a lot of space with
drawers, but sometimes they are more convenient. This
is a dishwasher drawer in the end of the counter to the right of the
sink. In my opinion it is the best place for a dishwasher. Ours is under
the cooktop where the oven would be, but this is a far better location.
It is closer to the sink, and uses an area that is not otherwise
optimally used. There is space for a drawer above the
dishwasher, although in this particular installation there are no
drawers. If you place the dishwasher here, there is room for two or three very
large drawers under the cooktop where the oven would be, or, you could
have an oven. In our case, instead of drawers under the cooktop we would
have two doors (opening to the sides) with an adjustable shelve in the
cabinet. This would maximize usable space - you lose a lot of space with
drawers, but sometimes they are more convenient.
 We
replaced the standard faucet with an oiled bronze Delta High Rise
faucet, model 19949-DST. This has a high pot faucet, removable spray
assembly, and a diamond-embedded ceramic cartridge for maximum lifetime.
This faucet is available from Lowes (but not Home Depot).
Take a look at it here. It also has a magnetic docking rim for the
removable spout. The standard faucet has been upgraded to a Moen version
that looks similar to this one. We prefer the Delta because of some of
its technical attributes. We
replaced the standard faucet with an oiled bronze Delta High Rise
faucet, model 19949-DST. This has a high pot faucet, removable spray
assembly, and a diamond-embedded ceramic cartridge for maximum lifetime.
This faucet is available from Lowes (but not Home Depot).
Take a look at it here. It also has a magnetic docking rim for the
removable spout. The standard faucet has been upgraded to a Moen version
that looks similar to this one. We prefer the Delta because of some of
its technical attributes.
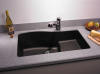 Instead of the standard stainless sink our 2012 New
Horizons will have a
Swanstone Ascend undermount sink in Expresso. It will have the
faucet shown above, without the plate, and a soap dispenser and reverse
osmosis water drinking water dispenser that also feed the refrigerator
icemaker/water dispenser.
Instead of the standard stainless sink our 2012 New
Horizons will have a
Swanstone Ascend undermount sink in Expresso. It will have the
faucet shown above, without the plate, and a soap dispenser and reverse
osmosis water drinking water dispenser that also feed the refrigerator
icemaker/water dispenser.
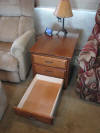

We had a custom end table made to sit between the
recliners. There are three 24" deep drawers that can hold laptop
computers, remote controls and office supplies. The table is cherry to
match the rest of the interior woodwork. A very nice addition, but
obviously pricey. This is a true piece of custom furniture.
 You can get a powered water reel that is similar to the power cord reel.
It comes in 50' and 75' lengths. It uses 1/2" water hose, which is
adequate but cuts down on flow slightly. Remember, your interior water
lines are all 1/2". You can substitute 5/8" line but it reduces the
length of the line.
You can get a powered water reel that is similar to the power cord reel.
It comes in 50' and 75' lengths. It uses 1/2" water hose, which is
adequate but cuts down on flow slightly. Remember, your interior water
lines are all 1/2". You can substitute 5/8" line but it reduces the
length of the line.
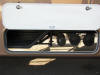 Here
is my preferred sewer compartment - at least the current version of it.
It has an extra sewer hose storage tube, and a
place for storing "black" elbows and connectors away from "clean" areas.
Something like this is likely to be standard in the 2013 models. Here
is my preferred sewer compartment - at least the current version of it.
It has an extra sewer hose storage tube, and a
place for storing "black" elbows and connectors away from "clean" areas.
Something like this is likely to be standard in the 2013 models.
Newsletter Articles
I write a technical article for inclusion in the New Horizons Newsletter
- usually on a bi-monthly basis. For those interested, the
following articles have been included in the Newsletter. These are
mostly the unedited versions, and may differ slightly from what was
published. You may find the complete Newsletter on the New Horizons
website.
|