|
|
||
|
|
|
|
|
|
||
Solar Panels and Solar Controllers
|
|
|
|
|
|
Copyright © 2002-2017 John Mayer. All rights reserved. For reuse policy see Reuse Policy In this section:
There are three types of panel technologies
worth discussing - Amorphous (thin film),
Poly-Crystalline (multi-crystal), and Mono-Crystalline (single crystal). Each of
these is made slightly differently and has different benefits. In general, the
monocrystalline cells are slightly more efficient, and thus produce panels that
are slightly smaller for a given output. This difference is not that great
however, and I would not use it as a major buying criterion.
What affects our use of solar panels in an RV environment? First is heat.
Panels are tested and rated at 77 degrees. That’s the panel temperature itself, not the
air. Think about the top of your RV in full sun – the panels are much hotter
than that, and drop voltage because of the heat. They are also mounted about
an inch (or so) from your roof, so ventilation is not the best. Second, is
solar orientation. The angle of the sun changes seasonally. In the winter,
it is very low in the sky. You don’t generally use a sun tracker on an RV,
so your panels are not optimally oriented for full solar gain. In
fact, you may choose to never tilt your panels, leaving them flat on your
roof for convenience. Next, is shade. Are your panels partially shaded? Does
your air conditioner cast a shadow sometime during the day? Does your crank
up antenna? What about all the dust/dirt on the panel surface? Last, is
wiring. You are going to drop some voltage due to wire loss between the
panel and batteries. These considerations apply to all panel types.
So, how many panels do you need? You have an estimate of the total amp hours (or watts) you use daily. To get a rough idea how much power a single panel produces, take its “rating” (lets say 120 watts, or 7.1 amps) and multiply that by 5. This assumes you are getting 5 hours of sun a day (optimal) and that your panels really are producing at their rated output – neither of which will be true most of the time. But it is good for estimating. Now divide this total output of one panel into the number of watts or amps you consume daily. So, for example, say I have older Kyocera 120 panels (120 watts, 7.1 amps Vmp). I’ll use amps to figure the required panels. I know I use 100 amp hours a day (DC), from my previous figuring. So 100 / (7.1x 5) = 100/35.5 = 3 panels (with rounding). But, I know I leave my panels flat, and I know not every day is sunny so I’ll use 4 panels. In my case, on my first RV with solar I started with 3 and added the fourth later, after I was experienced with our use. When looking for panels search the web. The prices vary, but compare panels by the cost per watt. New panels and new models are always being introduced. Make sure the company manufacturing the panels is one you feel will be around for the duration of the warrantee. Panels do go bad from time to time. The minimum warrantee on any panel worth considering should be 20 years. I prefer the panels available from Sun Electronics, Wholesale Solar, or Northern Arizona Wind and Sun (see the Equipment Recommendations section for my current recommendations). Also, I never mount panels with the intention to tilt them - and I do not recommend that you tilt panels unless you have special circumstances. While there is a great benefit to doing so in the winter most people have no business routinely climbing on their RV roof, and there are issues with wind load that need to be carefully addressed if you tilt. I have seen MANY panels ripped from RVs in the desert SW when tilted. I would much prefer an extra panel or use of an MPPT controller. And consider this: do you want to be going on your roof to lower your panels when a windstorm comes up? Even assuming you are there? That is NOT the time to be on your roof!!
Techie Stuff You Need to Know Solar panels are pretty simple in practice. Unlike lots of other areas, unless you have the interest you really can choose to ignore the base technology, how they work, and exploring the intricacies of panel design. But you do need to understand "some" of the techie stuff in order to pick panels, and to figure out if your energy needs are met. Panels are all measured in watts, which is a measure of energy. DC or AC - it does not matter. A Watt is a Watt. You can see that if you look at the formula: watt = amps*volts. So whether the voltage is AC or DC - 100 watts is 100 watts. Panels specifications are derived under "standard test conditions" or STC. You will often see that in literature. STC is just a certain set of parameters used during the measurements: light conditions, heat, etc. The thing to understand about STC is that it is NOT real world conditions, and you will infrequently, if ever, get the STC ratings from a panel. So do not expect to get 100 watts out of a solar panel rated at 100 watts very often. Now for some random terms. Vmp is voltage at maximum power. It is an important thing to know about a solar panel. The Vmp can be used to determine if the panel is a "high voltage panel". A typical 12 volt nominal panel will have a Vmp af between 1 and 18 volts (or so). This is used with a PWM controller. A high voltage panel will have a Vmp typically in the 28+ volt range. It is used only with an MPPT controller, which is designed to handle the higher voltage. Voc is voltage at open circuit. This is exactly what it seems - the voltage measured when the panel is in the sun and not hooked up to anything. This is what you should see when you test your new panel with a voltmeter in good sun before you put it on the roof. Near this, anyway, although it will not be exact. It is really not a figure used for much except determining charge controller size. Isc is the current from the panel under short circuit conditions....eg. the max you could ever see from the panel. You use this when you figure out wire sizes using the interactive voltage drop calculators and when you figure out the breaker sizes required. Imp is similar to Vmp, except it is the current at maximum power when hooked up. It is less than Isc. The above is a little more complicated than I've expressed it here - but I'm aiming for a practical use of the terms. There are nuances in the interrelationships of power and voltage that panels produce. But for our purposes, the above should suffice. Grid tie panels is a term used for panels intended to feed power back into the electricity grid, and not to charge batteries. There is no intermediate battery storage in a grid-tie application. These are also called "high voltage panels" since they typically have a Vmp of above 28 volts. In some cases significantly above that. Grid-tie panels are typically rated above 225-245 watts, and there are plenty in the 300+ watt area. In RV application grid-tie panels are used with MPPT controllers. These panels are physically larger since to get the 28+ volts they need more solar cells in them (remember, each cell provides around half a volt). Micro-inverters relate to grid tie applications. A microinverter is a small inverter integrated with a solar panel (typically). It converts that panels DC power to AC right at the panel and then sends that power directly into the electric grid. Why would you want to do this? Simplicity and efficiency, mainly. Since each panel has its own inverter you do not have to have a larger central inverter, or group of inverters, and issues affecting a panel do not affect the entire string. Microinverters are not used in RV applications. I only bring it up because you will hear the term and should understand the basics. Remember, in grid-tie applications the array of panels is directly sending energy through an inverter, which converts the DC to appropriate AC, synchronizes the power to the grid, and sends it out on the grid.
Panel Warranties Most panels carry a 20 or 25 year warranty. But read the fine print. Some have "stepped" performance warranties, eg, so much output after 5, 10, 15 years. A continuous output warranty is better (vs. stepped). But in the end, it boils down to price/watt vs. expected performance. One thing that you should know - almost all grid-tie panels, and even many low voltage panels, have wording in their warranty documentation that procludes use in a "mobile" environment. Meaning RVs and boats. Panels have been widely used in these applications for years, without issue. But it is important that you know what you are getting, and are willing to take the (minimal) risk. It will be hard to find high voltage panels that specifically allow use in a mobile environment. I have no qualms about using them in that application provided they are properly supported.
Panels and Shading The conventional wisdom is that you never mount panels where they may be shaded. Shading any portion of the panel means that the output drops to virtually nothing. How much it drops depends on the panel technology used, but for discussion purposes consider a partially shaded panel to produce no output. And if wired in series to another panel the entire string of panels is affected in a big way. This is one disadvantage to series-wired panels. So what is a "partially shaded" panel? Any shading at all is what I mean. Such as: a cellular antenna casting a shadow. An air conditioner next the the panel casting a shadow. Or even the aluminum mounting angle casting an edge shadow on the panel when the sun is low. All are shading a portion of a cell(s). And all reduce the output to essentially nothing. I'm now going to deviate from "conventional" solar panel advice. If you have filled your roof with panels that never get shade, are you finished? I would contend no! Mounting some additional panels where they will be shaded "sometimes" may be a good strategy to increase solar harvest. A panel mounted next to an AC unit that receives shade only part of the day will still produce significant power depending on the RV orientation and the sun angle. Likewise, a panel that gets a shadow cast by a satellite TV antenna part of the day may still produce significant power during the other part of the day. With the price of panels running around $1/watt you can take some liberties with mounting locations to maximize total energy harvest. But ONLY after mounting panels where they are never shaded. One caution: do not wire "shaded" panels in series with another panel. You will lose the output from both when any portion of the two is shaded. So careful panel design and layout is required.
Panels on Smaller RV's Smaller RVs present special considerations because of lack of roof space. While you can find grid-tie panels in the $1watt range, in most cases these will not be suitable for smaller RVs. Grid-tie panels have dimensions of at least 32"x66", and are typically larger than this. Putting this size panel on a smaller RV is generally either difficult or impossible. In the case of smaller RVs you want to look for a narrower panel. AM Solar sells some good narrow(er) panels that fit smaller RVs better than the huge grid-tie panels. Both the GS100 and GS135 are quite narrow. So look there - they are in the $2/watt range delivered to you. Remember, the grid-tie panels you see advertised for $1/watt do not include shipping. You really have to factor that in. Brian Boone ("Solar Brian") also sells a low voltage 160 watt panel that is 59"x26". That works well in tight spaces. His panels are available on ebay, and at the time of this writing include shipping for $165. That is a very good price for a shipped panel. Smaller RVs have special design considerations that need addressing. Mounting methods may vary because of roof curvature, MPPT controllers may be problematic because of panel size and resultant Vmp, and finding unshaded space is always an issue.
The Truth About Panels Solar panels are not going to output the watts in the rating sheets. In a typical RV application there are a number of factors at work to prevent this.
You are far better off putting on more watts of panels than you think you need, even if you do not have optimal battery storage for it. When calculating solar needs I typically figure on 4-5 hours of sun and about 75-80% of the rated wattage for harvest. I would go as far as to say that at current prices of around $1/watt (plus shipping) that most people should just design to maximize the number of panels on the roof. That is a generalization, and some larger coaches would not want to do that. But for most people that works out well. The other thing to bear in mind is that some of the "huge" grid-tie panels are not really usable on RVs. They are simply too large. The limits in most cases are around the 300 watt panels that run in the 40"x65"+ area. Much larger than that and you start getting into issues with most RVs. And, as discussed above, smaller RVs really have difficulty using grid-tie panels.
Planning Your Layout Planning on where the solar panels go is a critical step in your design process. Do not overlook this step or delving into the required details. "The devil is in the details" is an appropriate saying that applies to this step. Knowing how much space you have, and where it is can be the difference between a smooth install and a nightmare. Where are your roof obstructions? Can you move things around on the roof to generate more panel space? Each RV is different, but here are some hints:
Attaching Panels to the Roof
Also very similar are the "smart feet" at RVSolarStore.com, and for self sticking feet from the same source look at the "sticky feet". The sticky feet come with VHB tape for mounting on fiberglass. AM Solar has some very nice mounting systems. Take a look on their website here. I prefer their mounts. How you secure the brackets (or whatever you use) to the roof depends on the RV roof construction. If you have a roof that is fiberglass, with good lamination to its substrate, then you can actually use adhesive to bond the legs to the roof. If you do this, you need to use 3M 5200 fast cure adhesive. This is a high performance polyurethane adhesive. It will hold any panel or set of panels to the roof IF the surface roof material is properly bonded to the substrate. I've used it on many installations with no issues. I recommend 3-4 brackets per side if you have two panels bonded together. This gives you better surface area coverage. Most people not familiar with high performing adhesives are nervous about this method of attachment. If it makes you feel better, put ONE screw per leg on just the windward (leading) edge of the panels. The issue with using this attachment method on a rubber roof is that the rubber is often not well-bonded to the plywood below. I don't recommend just 5200 on a rubber roof. Generally, on a rubber roof I use dicor caulk under the leg, 2-3 screws (at least #12 for the bigger thread size) through the leg, and then Dicor caulk over the leg. Sometimes I cover the entire screw area of the leg with Eternabond after the Dicor dries. Try to mount the panels with a little tilt to them. This makes them self cleaning. Rain water will help wash dust off them. Plus, you do not want water sitting on your panels in a puddle. Most RV roofs are sloped from the center to the edges so you will naturally get a small tilt to the panels. The large grid-tie panels are especially prone to a slight "droop" in the middle. This collects water and dirt - something you do NOT want. With the larger panels make sure you mount them so they self-wash.
Also, the larger grid-tie panels that tend
to droop in the middle may need some additional support. How you mount them
is installation-specific, but avoid letting them droop in the middle. People
are sometimes advised that "grid-tie panels cannot be used on RV's". That is
not true - but they do have to be properly supported. ANY panel in the 60"
length area needs support in the middle.
Rules
of Thumb:
You can download a spreadsheet that helps you calculate your power requirements here.
Typical 12-volt solar panels deliver power to the solar controller at 16-18
volts, or thereabouts, depending on conditions. The purpose of the solar
controller is to translate this power into a form usable to charge 12-volt
batteries. Basically, the controller is a high-quality battery charger. To
complicate things even further, there are controllers like the Outback Flex,
some of the Blue Sky controllers, the Xantrex XW controller, the Morningstar Tristar MPPT line
and the MidNite Solar controllers that can take any voltage in (up to 150+ volts), and output 12-volts. This gives you great flexibility in
solar panel choice. Only on the smallest systems can you
use a solar panel connected directly to the battery bank without risking damage
to the batteries. (Note: 12-volts is the nominal battery voltage in this
discussion. The actual voltage is always higher than that in various charge
stages. But you still refer to the system as a 12-volt system. We do not discuss
24 volt or 48 volt battery banks here - they are not widely used in RVs, yet.
But there is a trend towards these higher volt battery banks.)
MPPT (maximum power point tracking) controllers have microprocessor
technology that allows them to convert some of the “excess” voltage
(when available) to amperage for more rapid charging of the battery
bank. They cost more but can effectively boost the gain from a solar
panel array, thus you may be able to save a panel. They are worth the
extra expense, in my opinion, if you are building a system that has at
least 3 panels and 400 amp hours of storage. For a good primer on MPPT
technology check
Northern
Arizona Solar - MPPT primer
and
Blue Sky Solar - MPPT Technology.
If the links do not work use Google. Only you can decide if the extra expense is
worth it to you.
Controllers are rated by the amperage they can handle from the solar array. So how big of a controller do you need? You want to be able to expand your system later without buying a new controller - assuming your roof has the space. If you are starting with only 2 panels you probably will add a third or even a fourth at some later time. You need to anticipate this, at least a little. I would always advise buying a bigger controller than you think you need – it is not that much extra cost. As an example, let’s use 3 – 120 watt panels rated at 7.1 amps (21.3 amps total). You are going to need a 25 amp controller – but what about room for growth? Maybe a 30-40 amp controller would be better. Bottom line: buy more controller than you need today, and you will be happy tomorrow. I'd buy enough controller to fully cover your roof with panels. For a good solar controller expect to spend $125-$180 on a PWM controller in the 25-40 amp range. If you want a remote display it will be around $100 more. For even the smallest MPPT controller you will spend at least $300, and as much as $600+ if you get a fully featured Outback, Morningstar, Midnite, or Xantrex XW controller. Charge controllers represent a relatively fixed and small proportion of the total system cost. Controller prices do not fluctuate much over time, like panel prices do. So, don’t wait for that great deal, and don’t skimp on capacity. Solar controllers usually have the option of having a battery temperature sensor (remember, they are really just battery chargers). This is worth the extra cost if it is not a standard feature. The reason is that the temperature at the battery affects the optimal charging algorithm. Controllers have the ability to adjust the charging algorithm dynamically, based on real time temperature information. The same adjustment can be made (independently) by your inverter/charger. So you will probably have two battery temperature sensors at your battery bank. The sensor either attaches to the battery post, or is taped to the side of a battery - it does not matter which way it attaches. The Morningstar MPPT controllers (and others) also have a voltage sense line for even better monitoring of the battery bank charge. This voltage sense capability is an important feature. It ensures that the controller is always putting the proper voltage onto the battery, despite potential line losses between the controller and battery. So, which controller should you get? Only you can decide. Xantrex C40’s are a reasonably priced PWM controller that can be expanded to accommodate most RV systems. These are now manufactured in China, and the quality is suspect. I'd buy a Morningstar before the C Series at this point. Blue Sky Energy’s Solar Boost series starts in the $200 range for a 20-amp version (the 40 amp 3024iL is an excellent controller and runs around $350+). The Outback Flexmax Series, the Xantrex XW controller, and the Morningstar Tristar MPPT 45 and MPPT 60 are outstanding MPPT controllers that can also do voltage conversion – allowing you to use higher voltage solar panels. More on voltage conversion later. All have an available LCD remote display, and cost about $500. Of all these controllers my first choice is the Morningstar Tristar MPPT 60. If you want PWM then the Morningstar Tristar would be my choice. MidNite Solar makes an excellent large series of controllers; I particularly like the Classic 150. This controller is the one I would use (and do use) for a large system - over 800 watts. Even if you are initially installing only 600 watts, you might consider this controller for future expansion of your system. Assuming you have the roof space for more panels. MidNite currently makes the Classic line in up to 250 volt models. They have an app for phones/tablets that allow for data viewing, and are sophisticated networked devices. Magnum also makes a solar controller that integrates with its inverter line. They share a display, and are intelligently networked together so charge capability between the inverter/charger and the solar controller are well managed and do not conflict. If you have a Magnum inverter it would be wise to consider the PT-100 controller. Bottom line for me: Large system - Classic 150
(or its bigger versions) or Magnum PT-100; medium system
- Morningstar MPPT 60; smaller system - Moriningstar MPPT45 or Tristar 45.
First, lets review some terminology we covered at the beginning of this section. When you hear of "grid-tie" or "high voltage" panels what is being referred to is a panel that has a Vmp above 18-19 volts. Twelve-volt nominal panels are all under 19 volts Vmp, and work off a PWM 12-volt solar controller. You can buy panels with a Vmp in excess of 35 volts, or you can connect two 12-volt panels in series, just like you do with batteries, to increase the voltage. Why would you do this? Two reasons: First, voltage loss over distance is reduced as voltage is increased. You can send 24 volts two times as far as 12 volts over the same wire size (at a specified rate of loss). This means you can use smaller wire, or perhaps use the wire your manufacturer already ran in the “solar prep” package if it is otherwise too small. Or, if the solar controller is far from the solar panels you can minimize voltage loss by sending higher voltage to the controller instead of 12 volts. The table below is an example of voltage drop vs. distance and wire size. A close look at the table should give you a good idea of how distance effects low voltage. The table is meant as an example - ALWAYS use the voltage drop online calculators to figure your wire sizes: Voltage Drop Calculator or this calculator. (If the link is broken just Google on "voltage drop calculator" and you will find many. Use 2% or less for the acceptable drop. Second, use of an MPPT controller will gain you an average of (around) 10% additional solar harvest over using PWM controllers. While there is an extra cost to the MPPT controller, these two factors may make higher voltage panels worthwhile in your application.
To use grid-tie panels you need a solar controller that can convert that higher voltage input to 12-volt (nominal) output. There are a number of controllers that can do this, and they are all MPPT technology. They tend to be higher-priced controllers with advanced features, so you have an overall better package. I particularly like the the Morningstar Tristar 45 and 60 MPPT controllers, and for larger systems the MidNite Solar Classic 150, or their larger models where appropriate. And if you are using a Magnum inverter then look closely at the Magnum PT-100 solar controller. It integrates well into the Magnum system, and shares the display panel with the inverter.
In reality, all these controllers can take any voltage input up to 150+V (or
up to their rated voltage) and
down-convert it to their output rating (for our discussion, always 12V
nominal,
since we are using a 12-volt battery bank). So
that opens up a wide variety of panels for potential use.
A note on voltage: with a PWM controller you are working with lower voltages - up to around 19 volts. So the design focus and ratings are based on how much current the controller can handle. When working with MPPT controllers you also have to factor in the voltage ratings. The controllers are rated for the max voltages they can handle - the ampacity ratings have to be considered, but the focus is on voltage handling. Voltage has to be down converted on output to the battery bank - remember, in the cases we are considering here we are dealing with 12 volt nominal battery banks. Not all MPPT controllers can handle very high voltages like the MidNite Solar Classic 150. So if you are putting grid tie panels in series you need to be aware of the max voltage handling capabilities of your controller.
Obviously, you need to decide if you want to go with higher-voltage panels during the design stage. If you go this route, look for higher voltage panels typically used in grid-tie applications. They will make installation a little easier. You can easily use pairs of 12-volt panels in series, but the wiring will be a little more complicated. The price per watt is always the determining factor for me. If the price was close I’d go with the larger higher voltage panels, assuming they will lay out on the roof properly. Remember - NO shading.
If you are going to use a series/parallel wiring layout the panels should all be the same rating. You do not want to mix panels with different Vmp ratings, since they will not perform to their potential. Lower voltage panels tend to "pull down" the higher voltage ones. Ratings should be within .2-.3 volts of each other (notice the decimal point). Also, the pairs need to be co-located. It is not a good practice to separate them with long wire runs between them.
One consideration of using these higher voltage panels is that they are physically larger, since they have additional cells. Make sure that the panels will fit on your roof without being shaded.
The pragmatics and tradeoffs of wiring high voltage panels is discussed more in the Wiring section. Solar Controller Summary
|
|
|
|
||
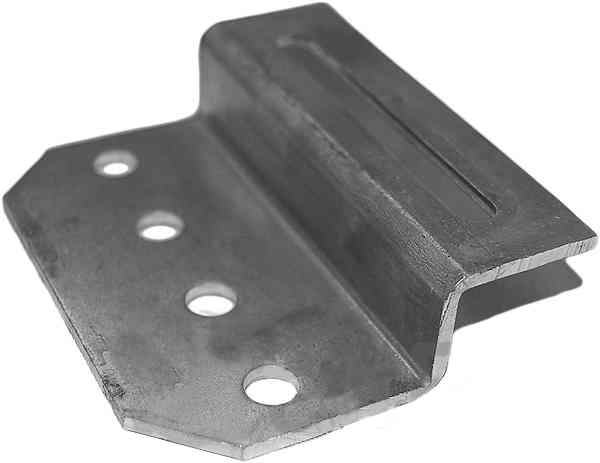
 There
are many ways to attach panels to the roof. The bracket on the far left is by UniRac (at
the time of writing this, about $17 for 4 at Sun Electronics) and made to directly attach the
panel to the roof. This type of bracket is generally referred to as a "Z"
bracket. If you blow up the picture (click on it) you will see
that on the panel side it has a slot that allows easy attachment to existing
holes in the panel. If you mount it this way the only way to remove the
panel for service is to get under the edge of the panel to the screw, or
remove the portion on the roof. Both are difficult. It is much better to
attach some aluminum angle to the side of the panel with the L extending out
away from the panel. This provides an "extension" edge that you can then
mount the bracket to. This makes it easy to remove the panel if required,
without disturbing the roof portion of the bracket. Usually, I bond two
panels together with a continuous run of aluminum angle, then fasten each
side to the roof with two or three brackets (depending on the panel size).
There
are many ways to attach panels to the roof. The bracket on the far left is by UniRac (at
the time of writing this, about $17 for 4 at Sun Electronics) and made to directly attach the
panel to the roof. This type of bracket is generally referred to as a "Z"
bracket. If you blow up the picture (click on it) you will see
that on the panel side it has a slot that allows easy attachment to existing
holes in the panel. If you mount it this way the only way to remove the
panel for service is to get under the edge of the panel to the screw, or
remove the portion on the roof. Both are difficult. It is much better to
attach some aluminum angle to the side of the panel with the L extending out
away from the panel. This provides an "extension" edge that you can then
mount the bracket to. This makes it easy to remove the panel if required,
without disturbing the roof portion of the bracket. Usually, I bond two
panels together with a continuous run of aluminum angle, then fasten each
side to the roof with two or three brackets (depending on the panel size).